Setting up a custom VPC with EC2 instances on AWS
- aws
- November 15, 2022
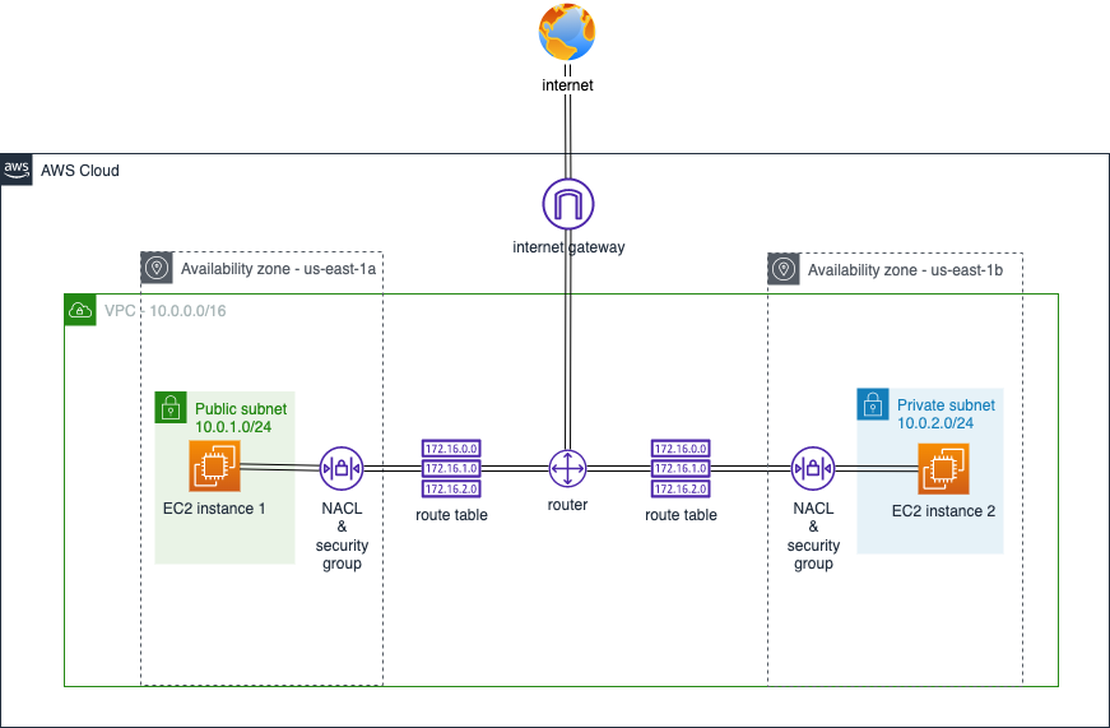
In this lab, we will build a custom VPC with a public and a private subnet. Each subnet will have its own route table and a Network ACL attached, while only the public subnet will be attached to Internet Gateway and have access to internet.
In the end, we will automate the process by deploying the same infrastructure in CloudFormation, which is a service in AWS that enables developers to provision resources programmatically.
Table of Contents
If you are using PuTTY to connect to EC2 instances, use these instructions .
Creating a custom VPC
In the AWS console, navigate to VPC and then click on Create VPC. On the VPC creation page, select the following parameters:
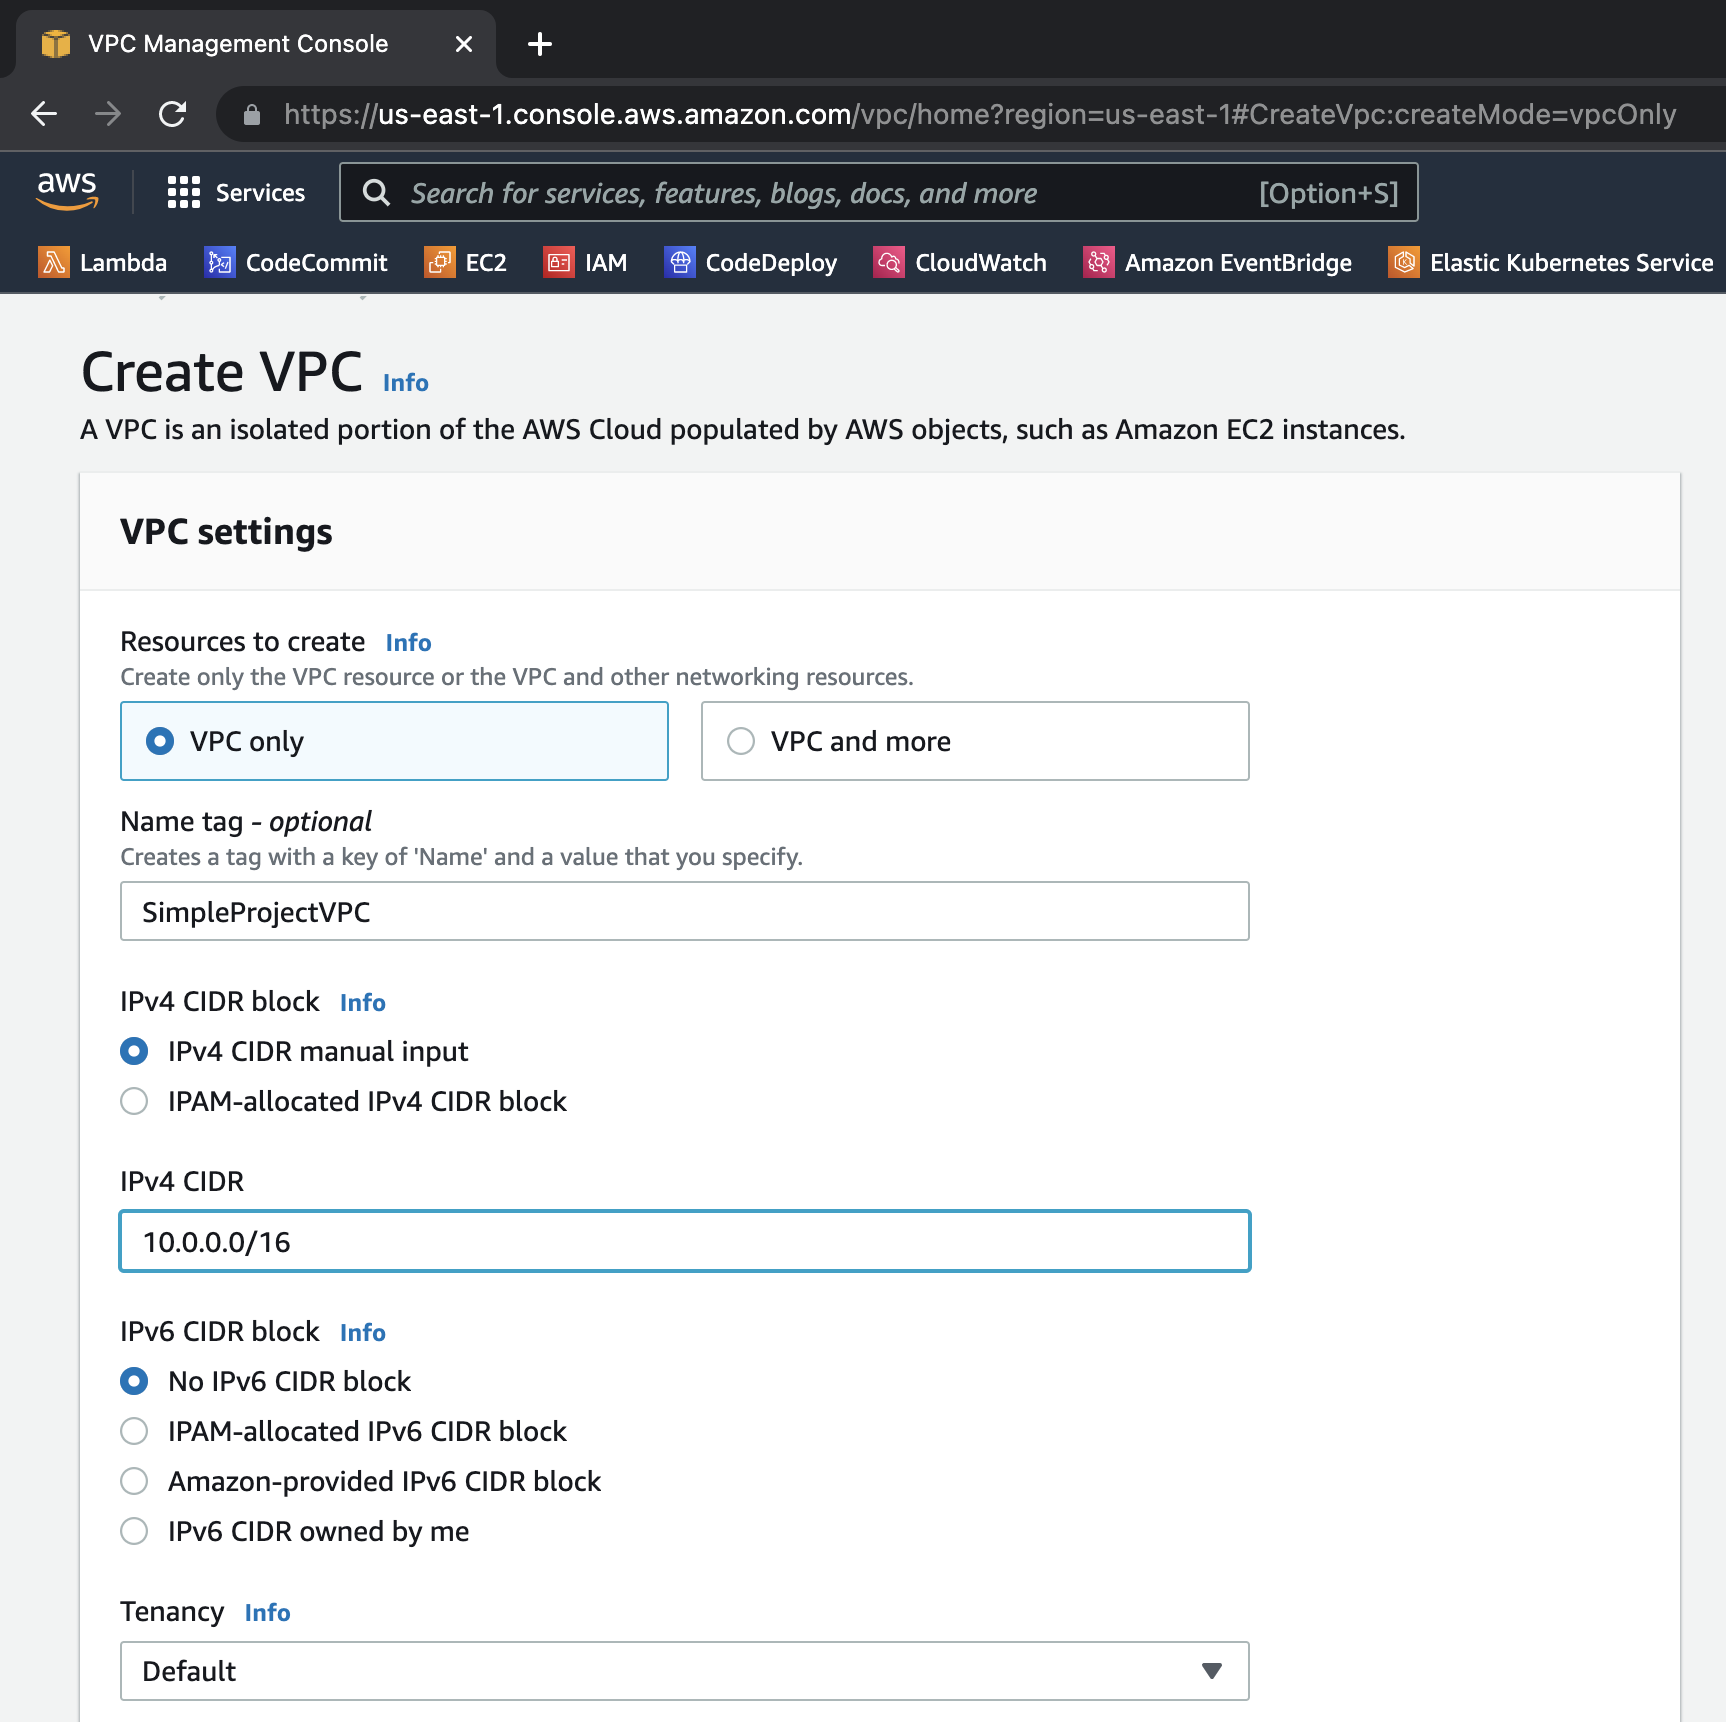
Scroll down and click Create VPC.
Creating subnets
- On the same page (after VPC creation), in the left-hand menu, click on Subnets.
- On the Subnets page, click on Create subnet.
- On the Subnet creation page, select the following parameters:
- choose SimpleProjectVPC from available VPCs (your VPC id will be different)
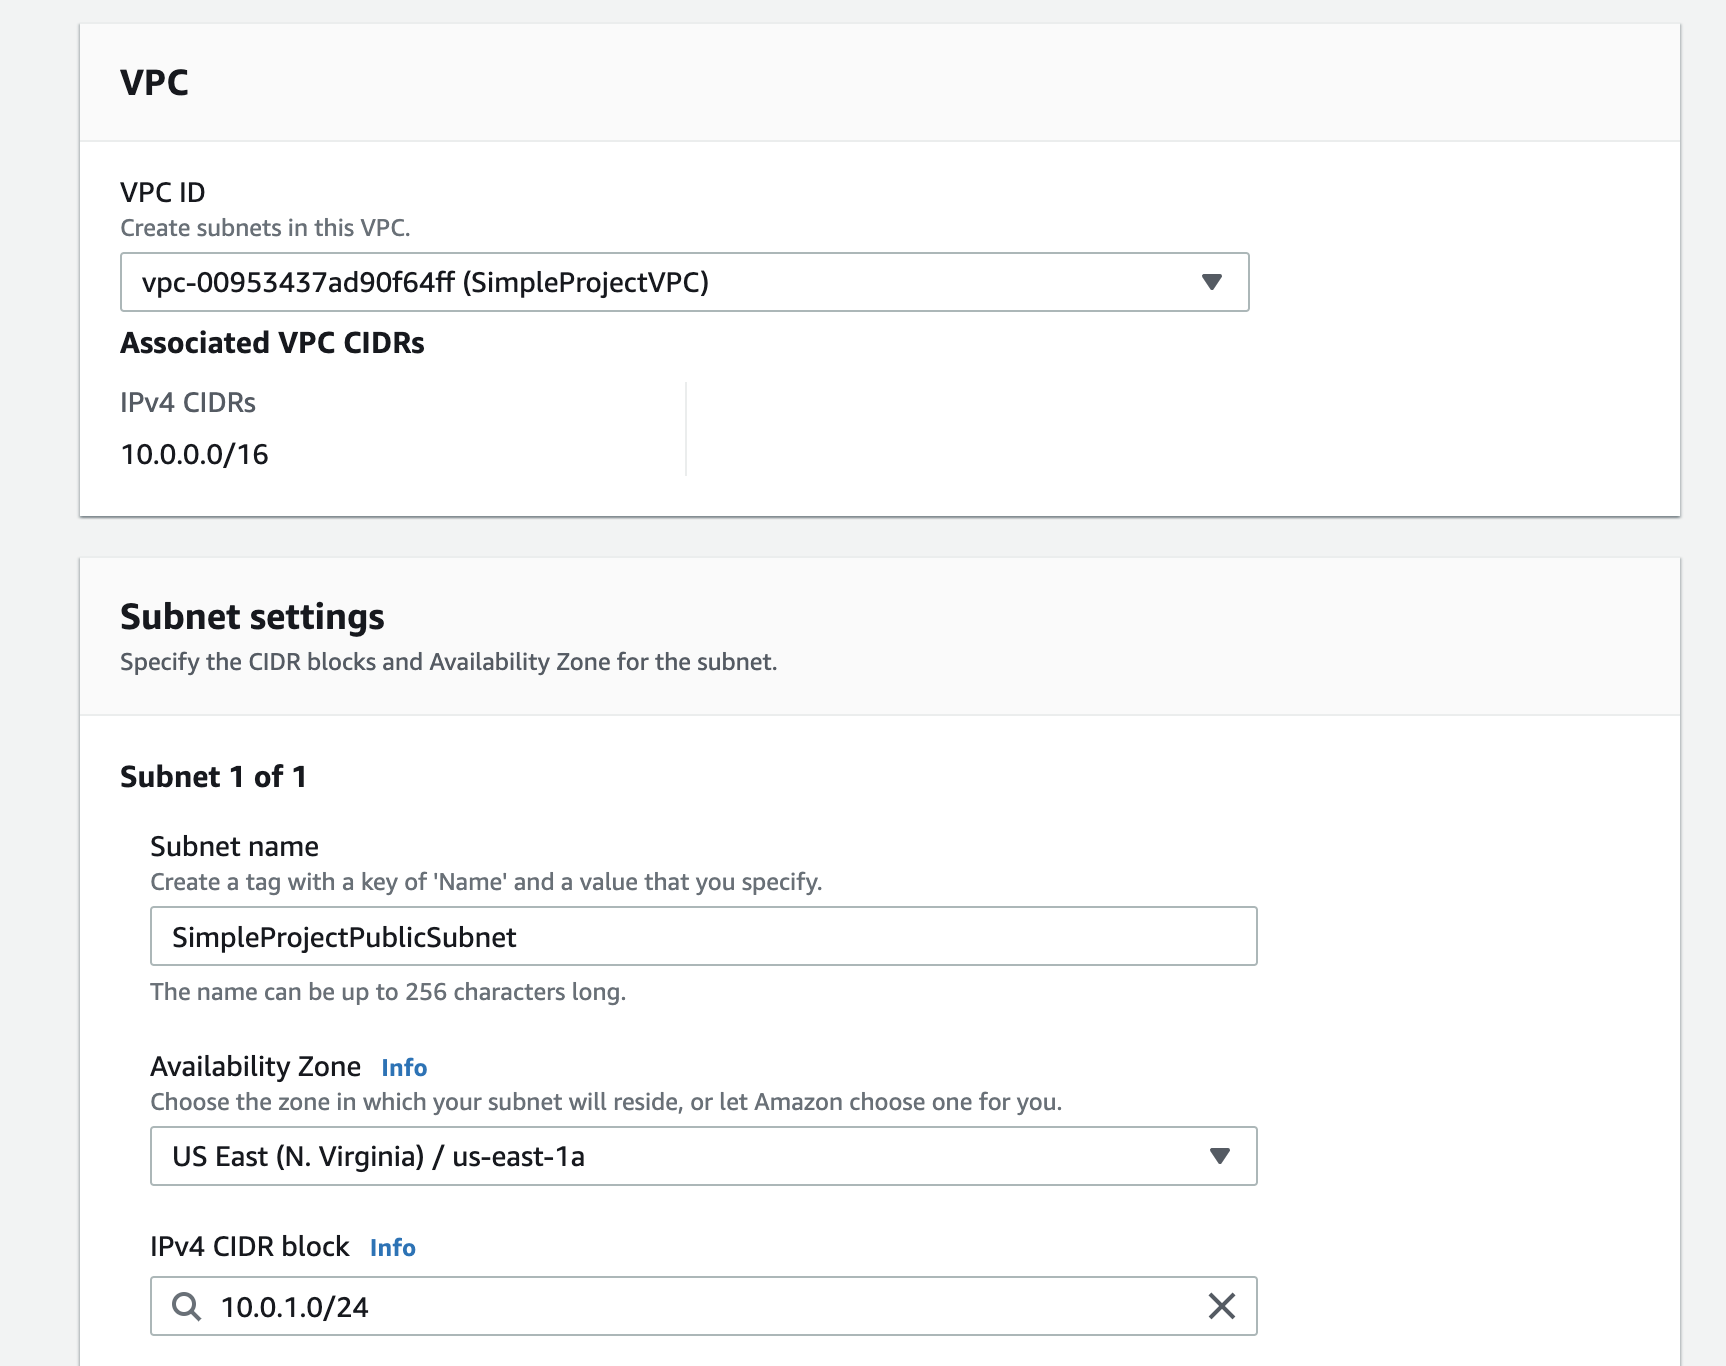
With this we are done with public subnet settings, click Add new subnet to create private subnet:
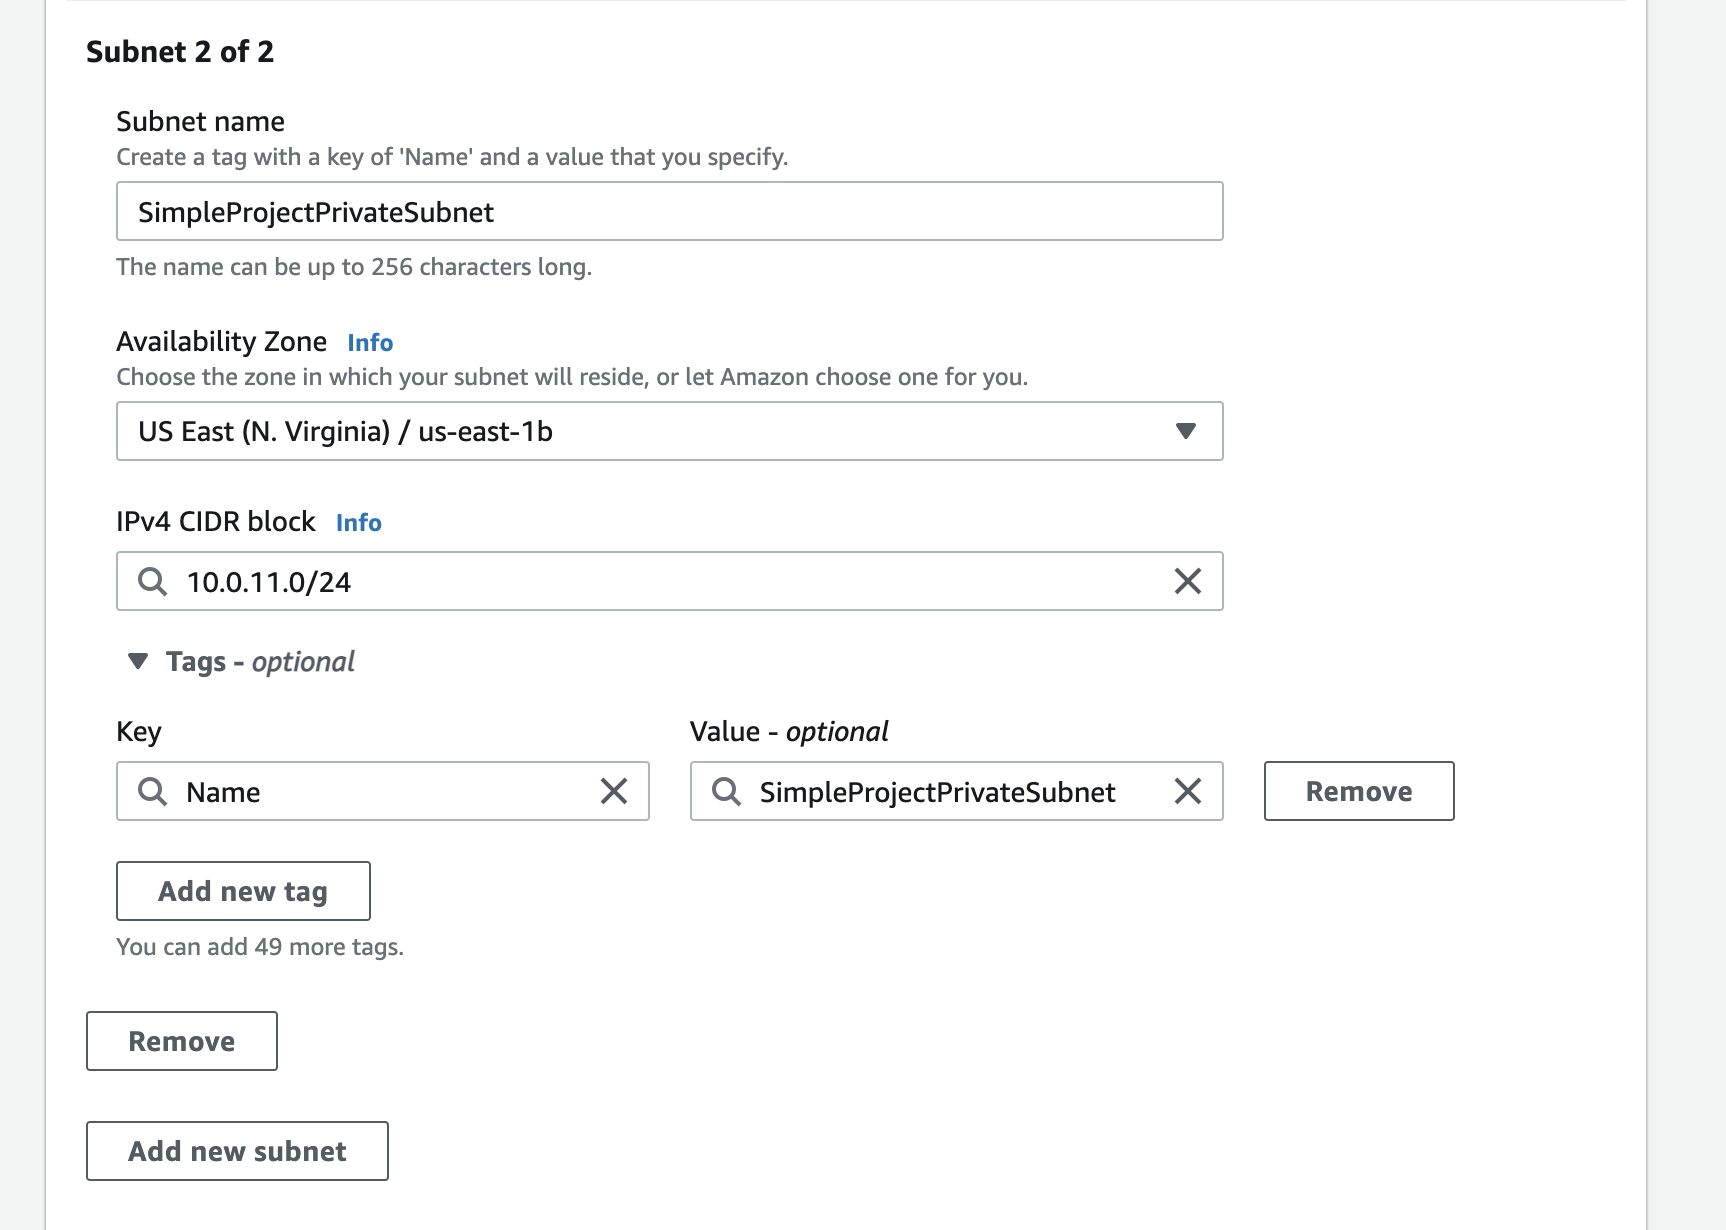
Finally, click on Create Subnet to create our subnets.
Enabling Auto-assign public IPv4 address for the public subnet
Staying on the Subnets page, select our public subnet (SimpleProjectPublicSubnet), click on Actions on the top right corner and click on Edit subnet settings:

On settings page, click on the checkbox for Enable auto-assign public IPv4 address:
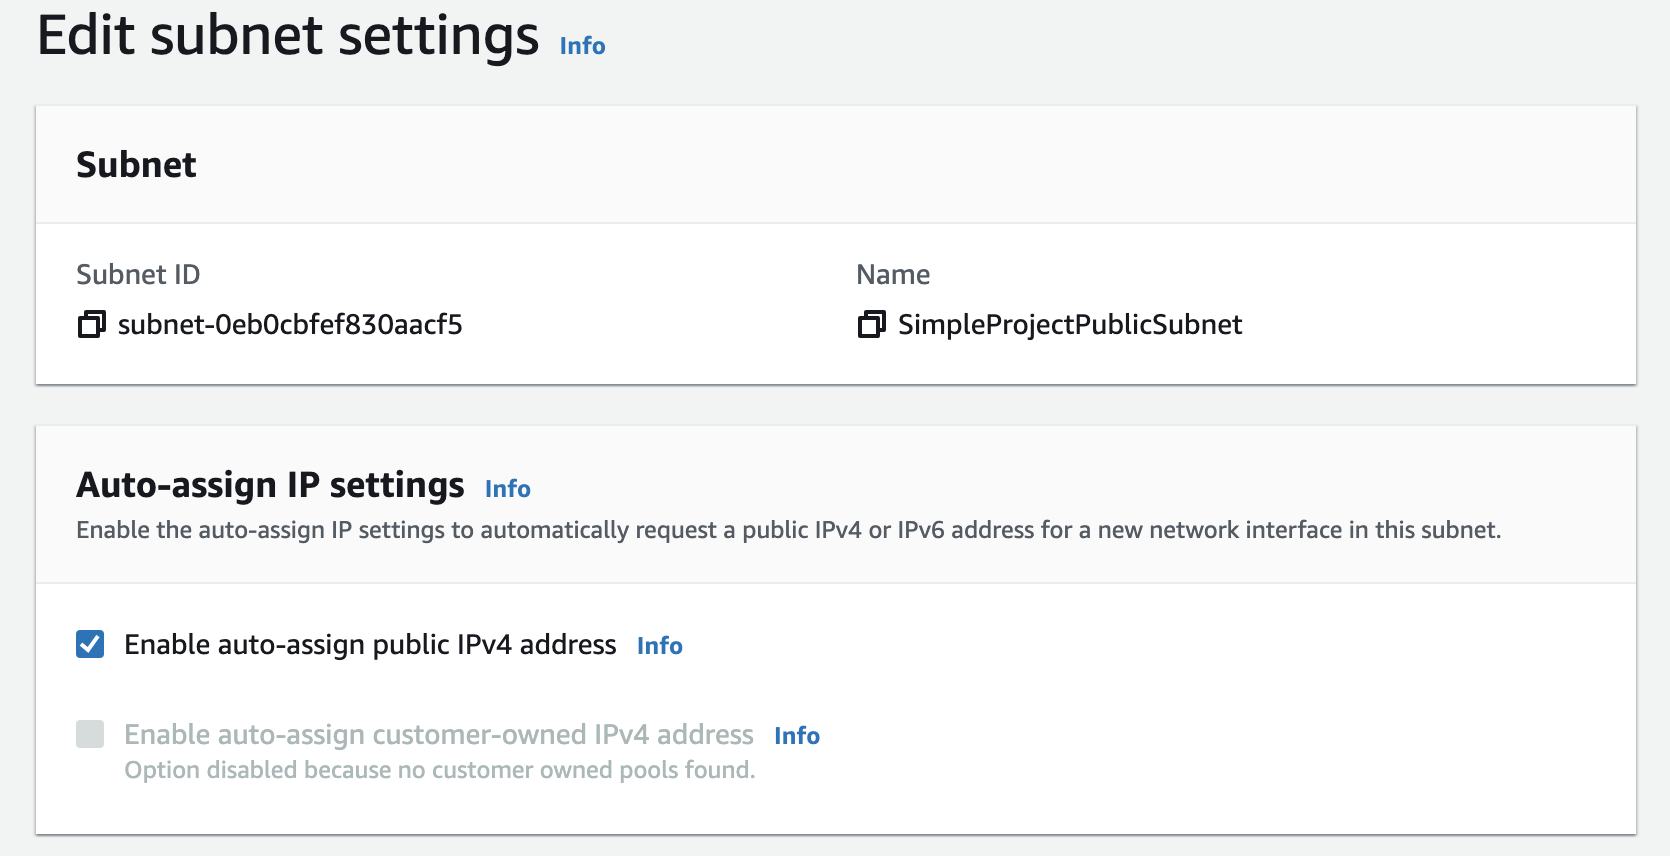
Click Save at the bottom of the page.
Configuring an Internet Gateway
In the left-hand menu of Subnets page, select Internet gateways. On the Internet gateways page, click Create internet gateway in the top right. On the new window, enter SimpleProjectIGW for the Name tag and click on Create internet gateway at the bottom of the page:
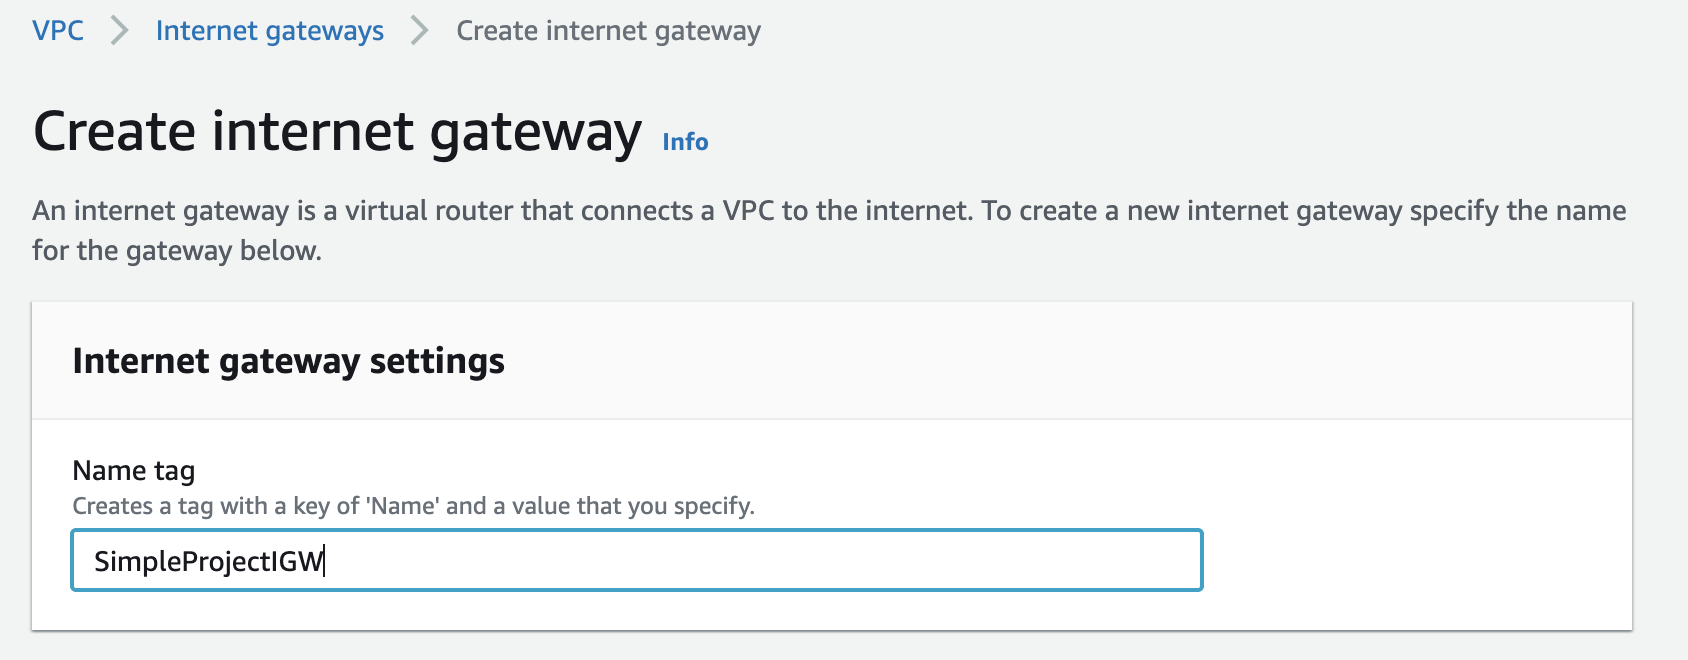
After our internet gateway is created, attach it to the VPC we created earlier:

Select the SimpleProjectVPC from available VPCs and click on Attach internet gateway:
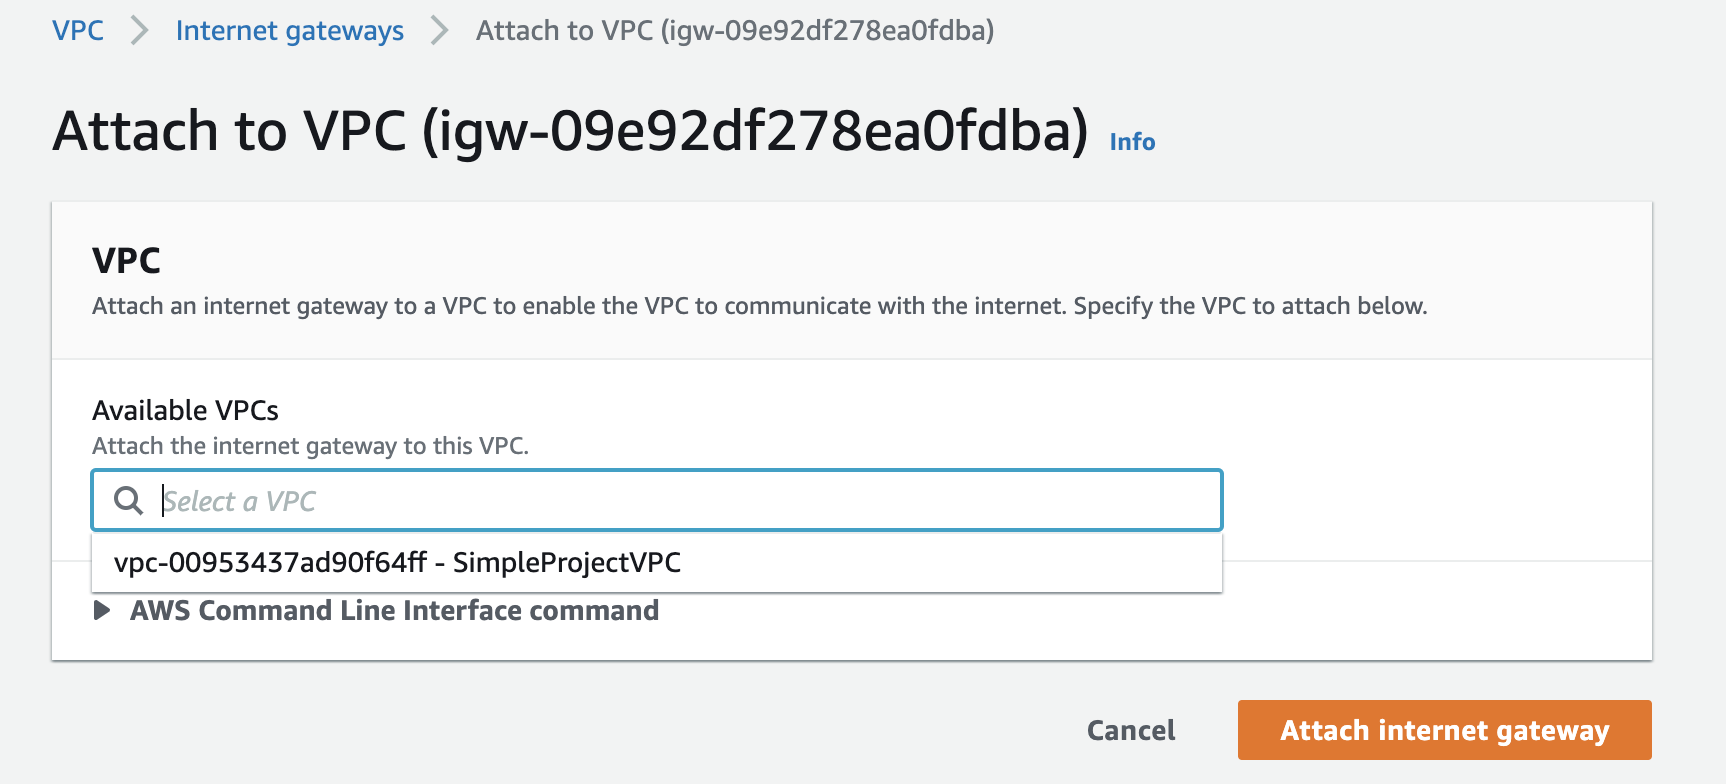
Configuring a Public Route Table
Creating a Public Route Table:
In the left-hand menu of Subnets page, select Route tables and click Create route table. Enter the fields as below and finally click on Create route table at the bottom of the page:
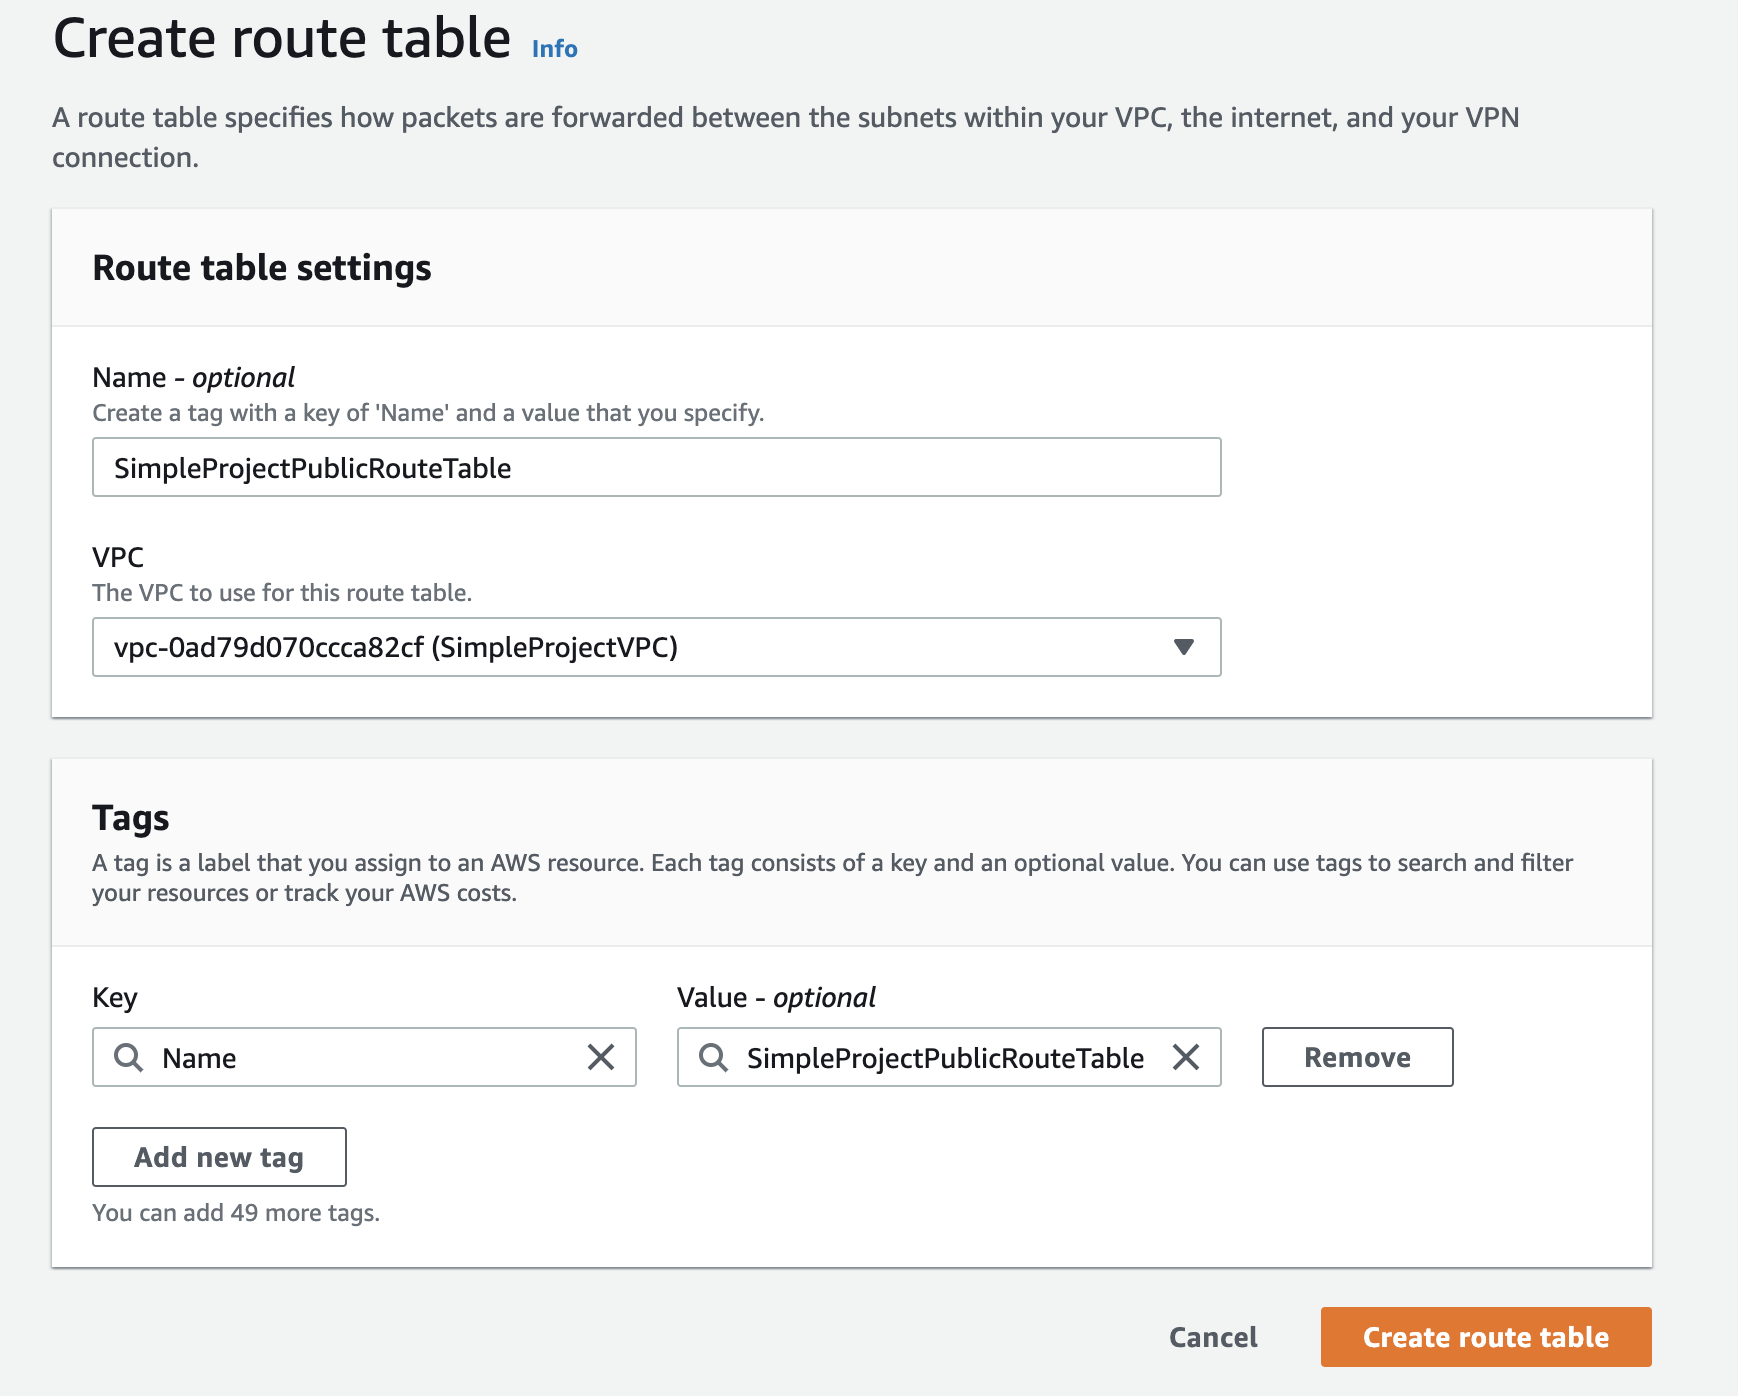
Add destination to Internet Gateway in Public Route Table:
With SimpleProjectPublicRouteTable selected on the Route tables page, click on the Routes > Edit routes:
- Add a new route 0.0.0.0/0 and select Target as Internet Gateway with SimpleProjectIGW.

Associate the Public Route Table with the Public Subnet:
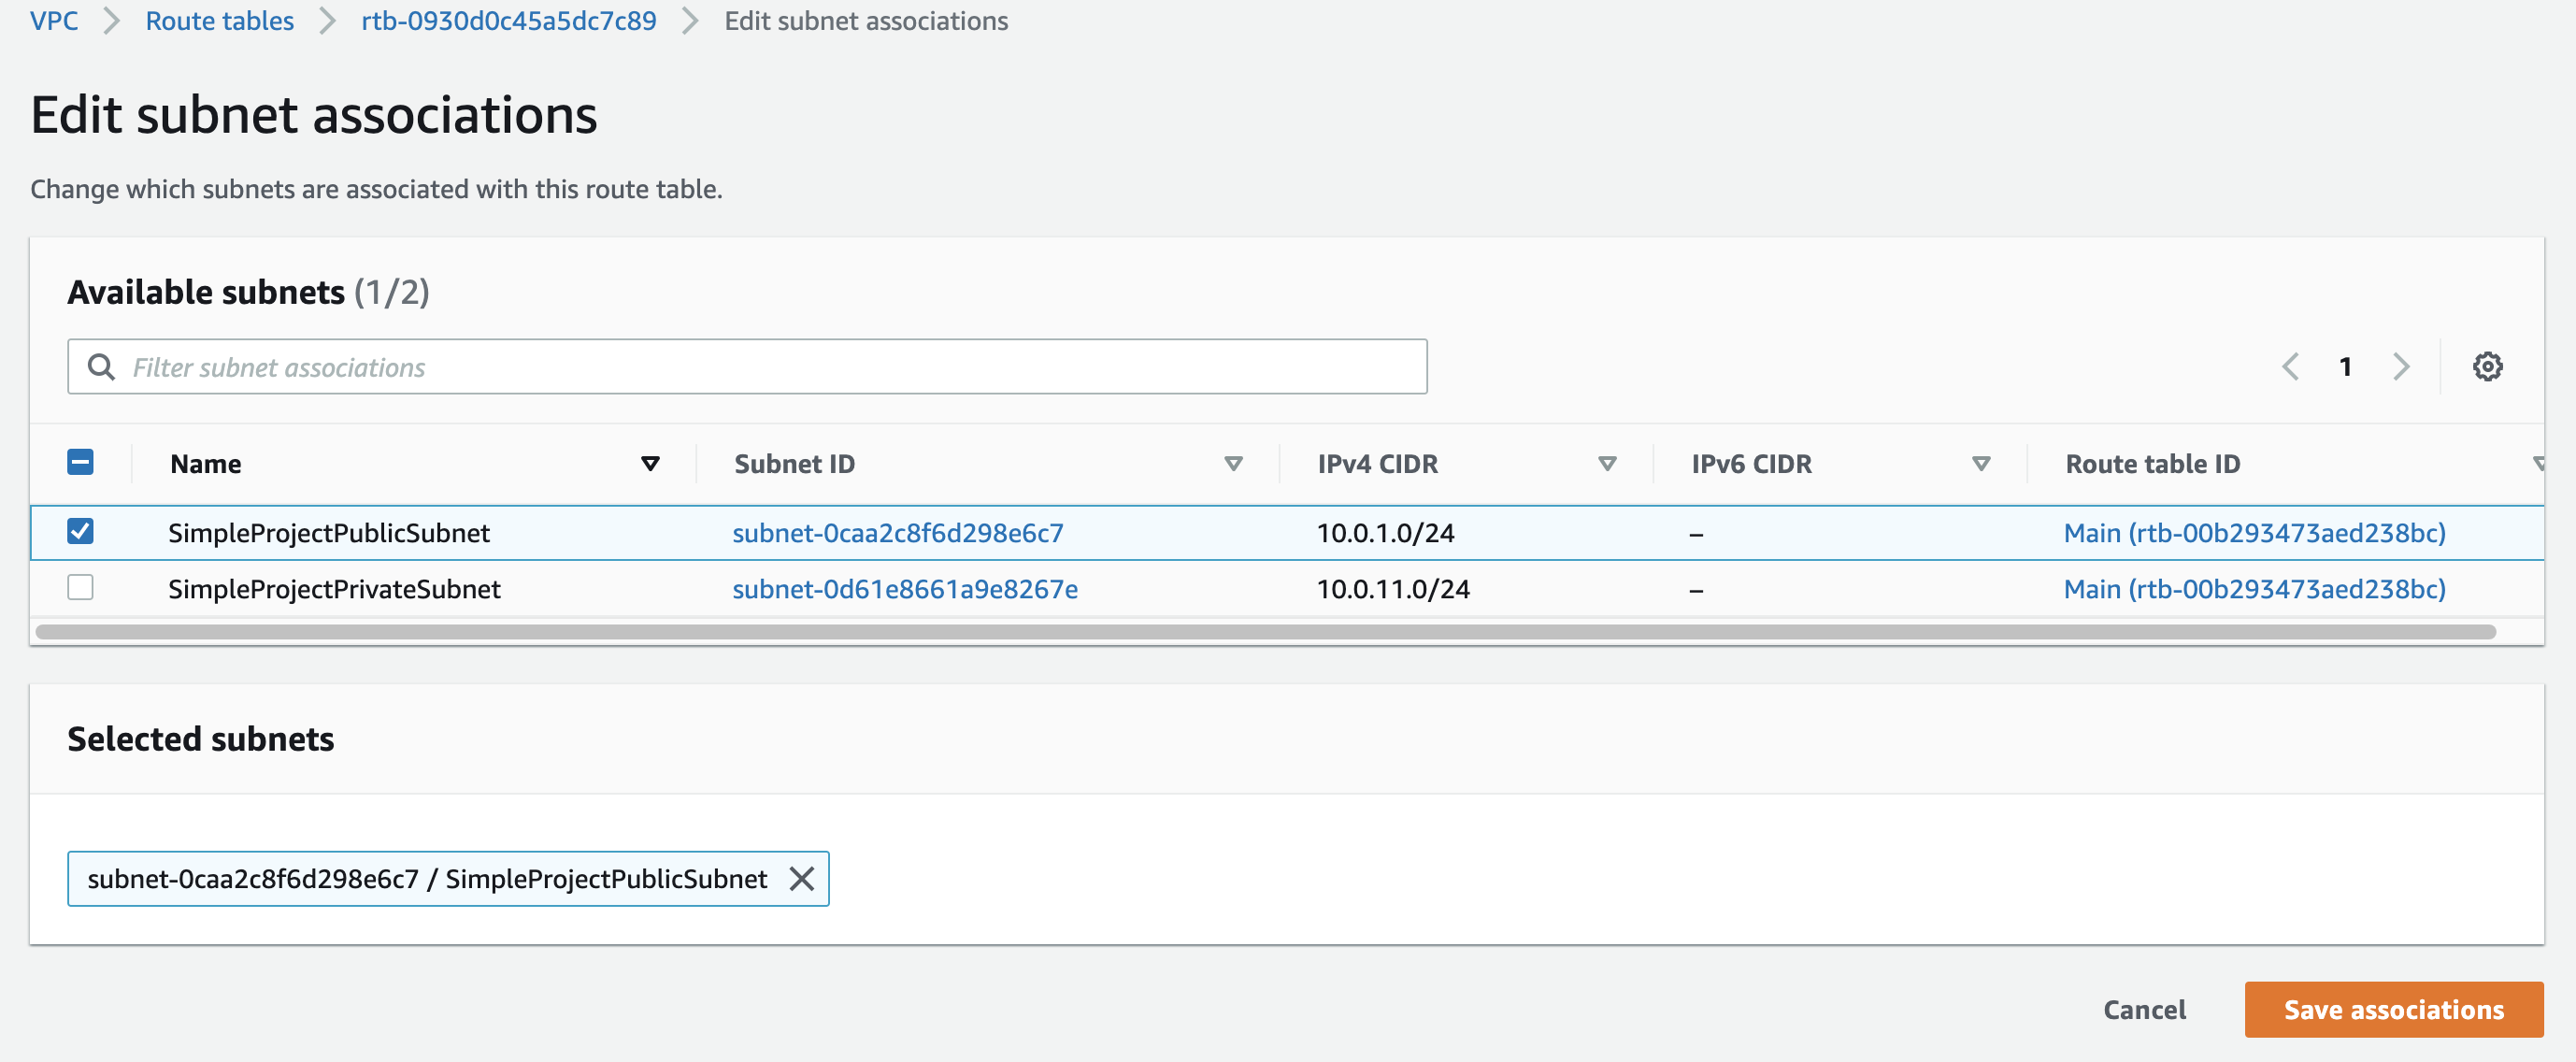
With SimpleProjectPublicRouteTable selected on the Route tables page, click on the Subnet associations > Edit subnet associations:
- choose SimpleProjectPublicSubnet checkbox and save the changes.
Launching an EC2 Instance in the Public Subnet
Navigate to the EC2 service by typing EC2 into the search bar at the top of the page and selecting EC2 from the dropdown. In the left-hand menu, click Instances. On the Instances page, select Launch instances in the top right:
- In the Name and tags section, enter SimpleProjectPublicEC2 in the name field.
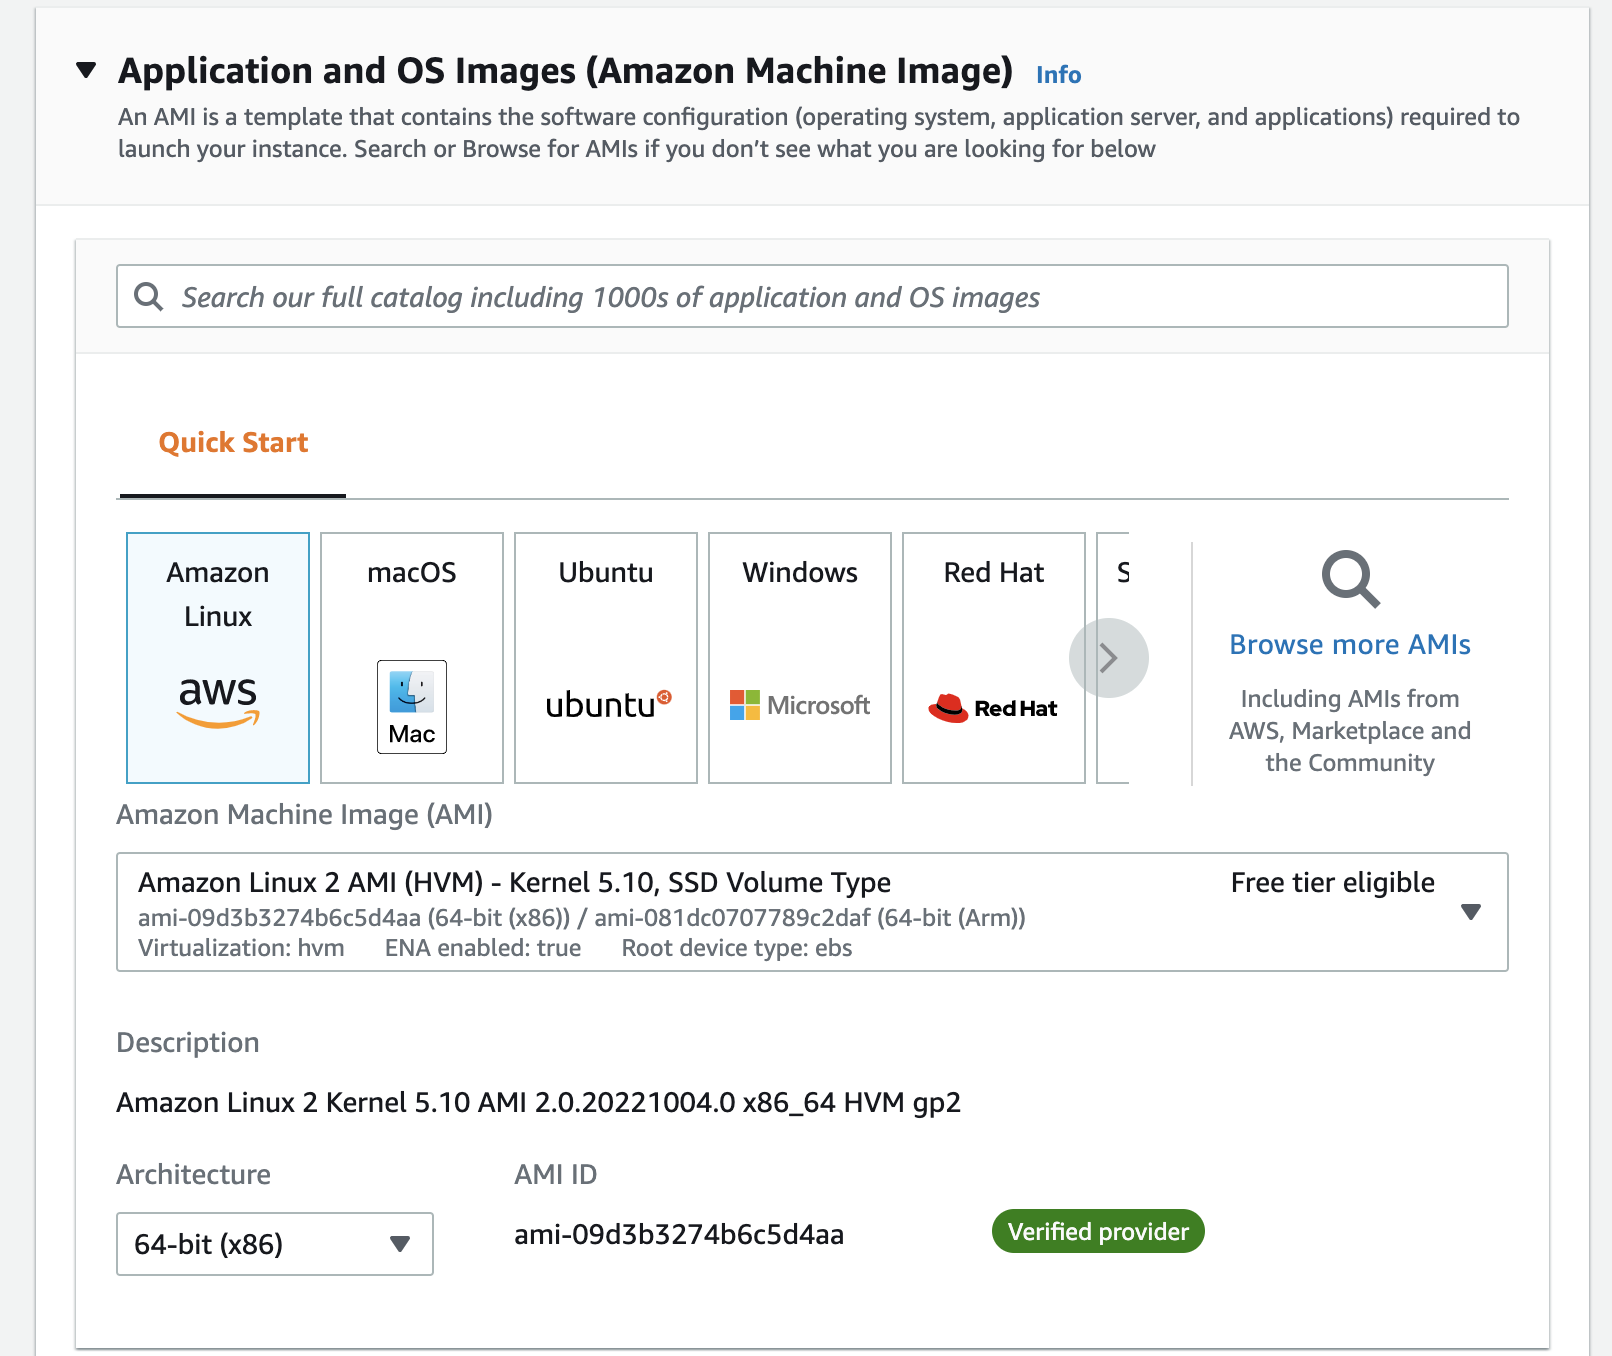
- In the Application and OS Images section, leave everything as default:
- In the Instance Type section, select t2.micro from the dropdown.
- In the Key pair (login) section, click Create new key pair.
- In the Create key pair window, for the Key pair name, type SimpleProjectPublicEC2.
- Leave the Key pair type set to RSA.
- For the private key file format, choose either .pem (for mac ) or .ppk (for windows)
- Click Create key pair.
- In the Network settings section, click Edit.
- Select SimpleProjectVPC for VPC and SimpleProjectPublicSubnet for Subnet.
- Leave Auto-assign public IP as Enable.
- For Firewall (security groups) select Create security group
- For Security group name, type SimpleProjectPublicSG.
- For Description - required, type Enable ssh access from your IP address
- For Security Group rule 1, set the following fields:
- Type: ssh
- Source type: My IP
- Click Add security group rule.
- For Security Group rule 2, set the following fields:
- Type: ssh
- Source type: Custom
- Source: 10.0.0.0/16
- Leave the rest as default, and click Launch instance.
Launching an EC2 Instance in the Private Subnet
In the Name and tags section, enter SimpleProjectPrivateEC2 in the name field.
In the Key pair (login) section, click Create new key pair.
- In the Create key pair window, for the Key pair name, type SimpleProjectPrivateEC2.
- Leave the Key pair type set to RSA.
- For the private key file format, choose either .pem (for mac ) or .ppk (for windows)
- Click Create key pair.
- In the Network settings section, click Edit.
- Select SimpleProjectVPC for VPC and SimpleProjectPrivateSubnet for Subnet.
- Leave Auto-assign public IP as Disable.
- For Firewall (security groups) select Create security group
- For Security group name, type SimpleProjectPrivateSG
- For Description - required, type Private security group
- For Security Group rule 1, set the following fields:
- Type: ssh
- Source type: Custom
- Source: 10.0.0.0/16
- Leave the rest as default, and click Launch instance.
Configuring a Network ACL (optional)
In the VPC page, under Security section in the left hand menu, click on Network ACLs.
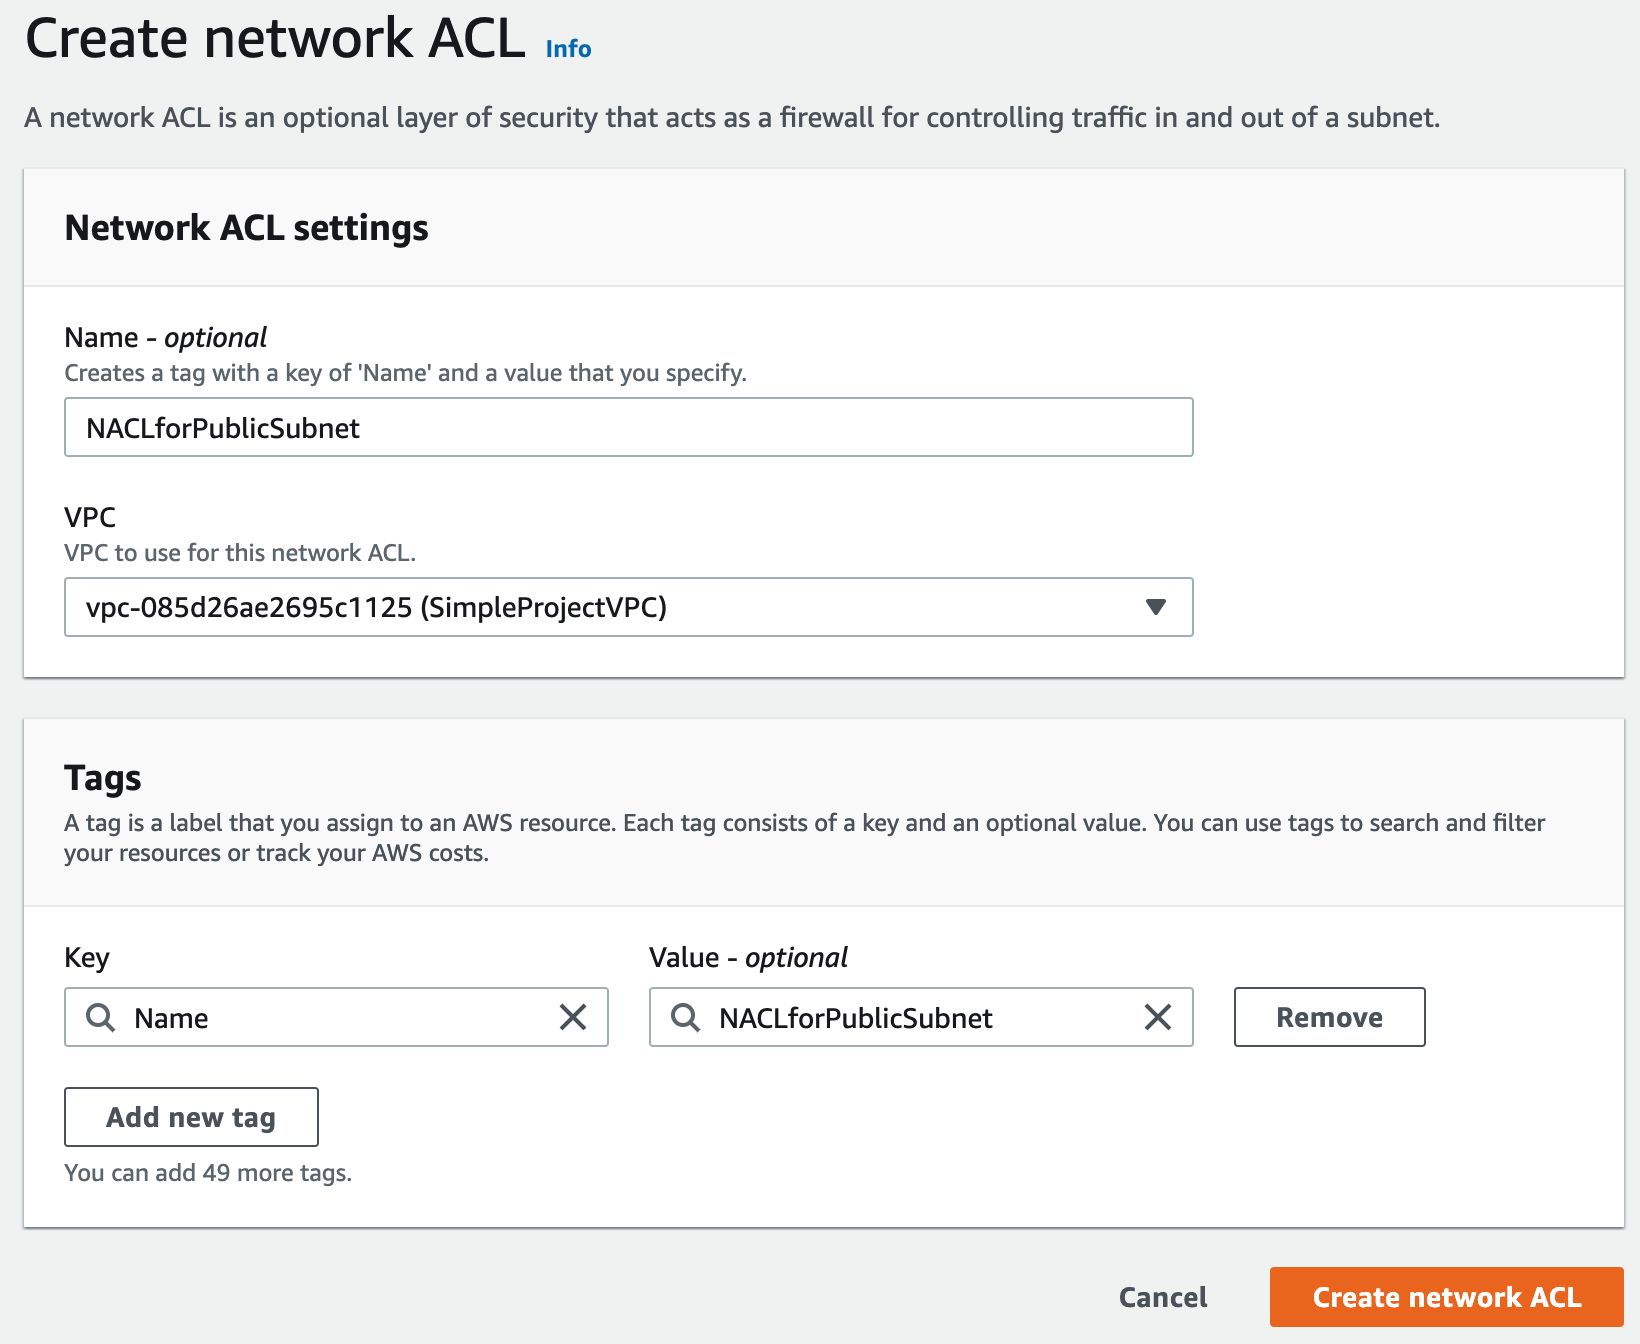
In the Create network ACL page:
- Under Name type NACLforPublicSubnet
- Under VPC select SimpleProjectVPC from dropdown menu.
- Click on Create network ACL.
Click the checkbox next to the NACLforPublicSubnet and click on Edit inbound rules:

In the Edit inbound rules page, add new rules:
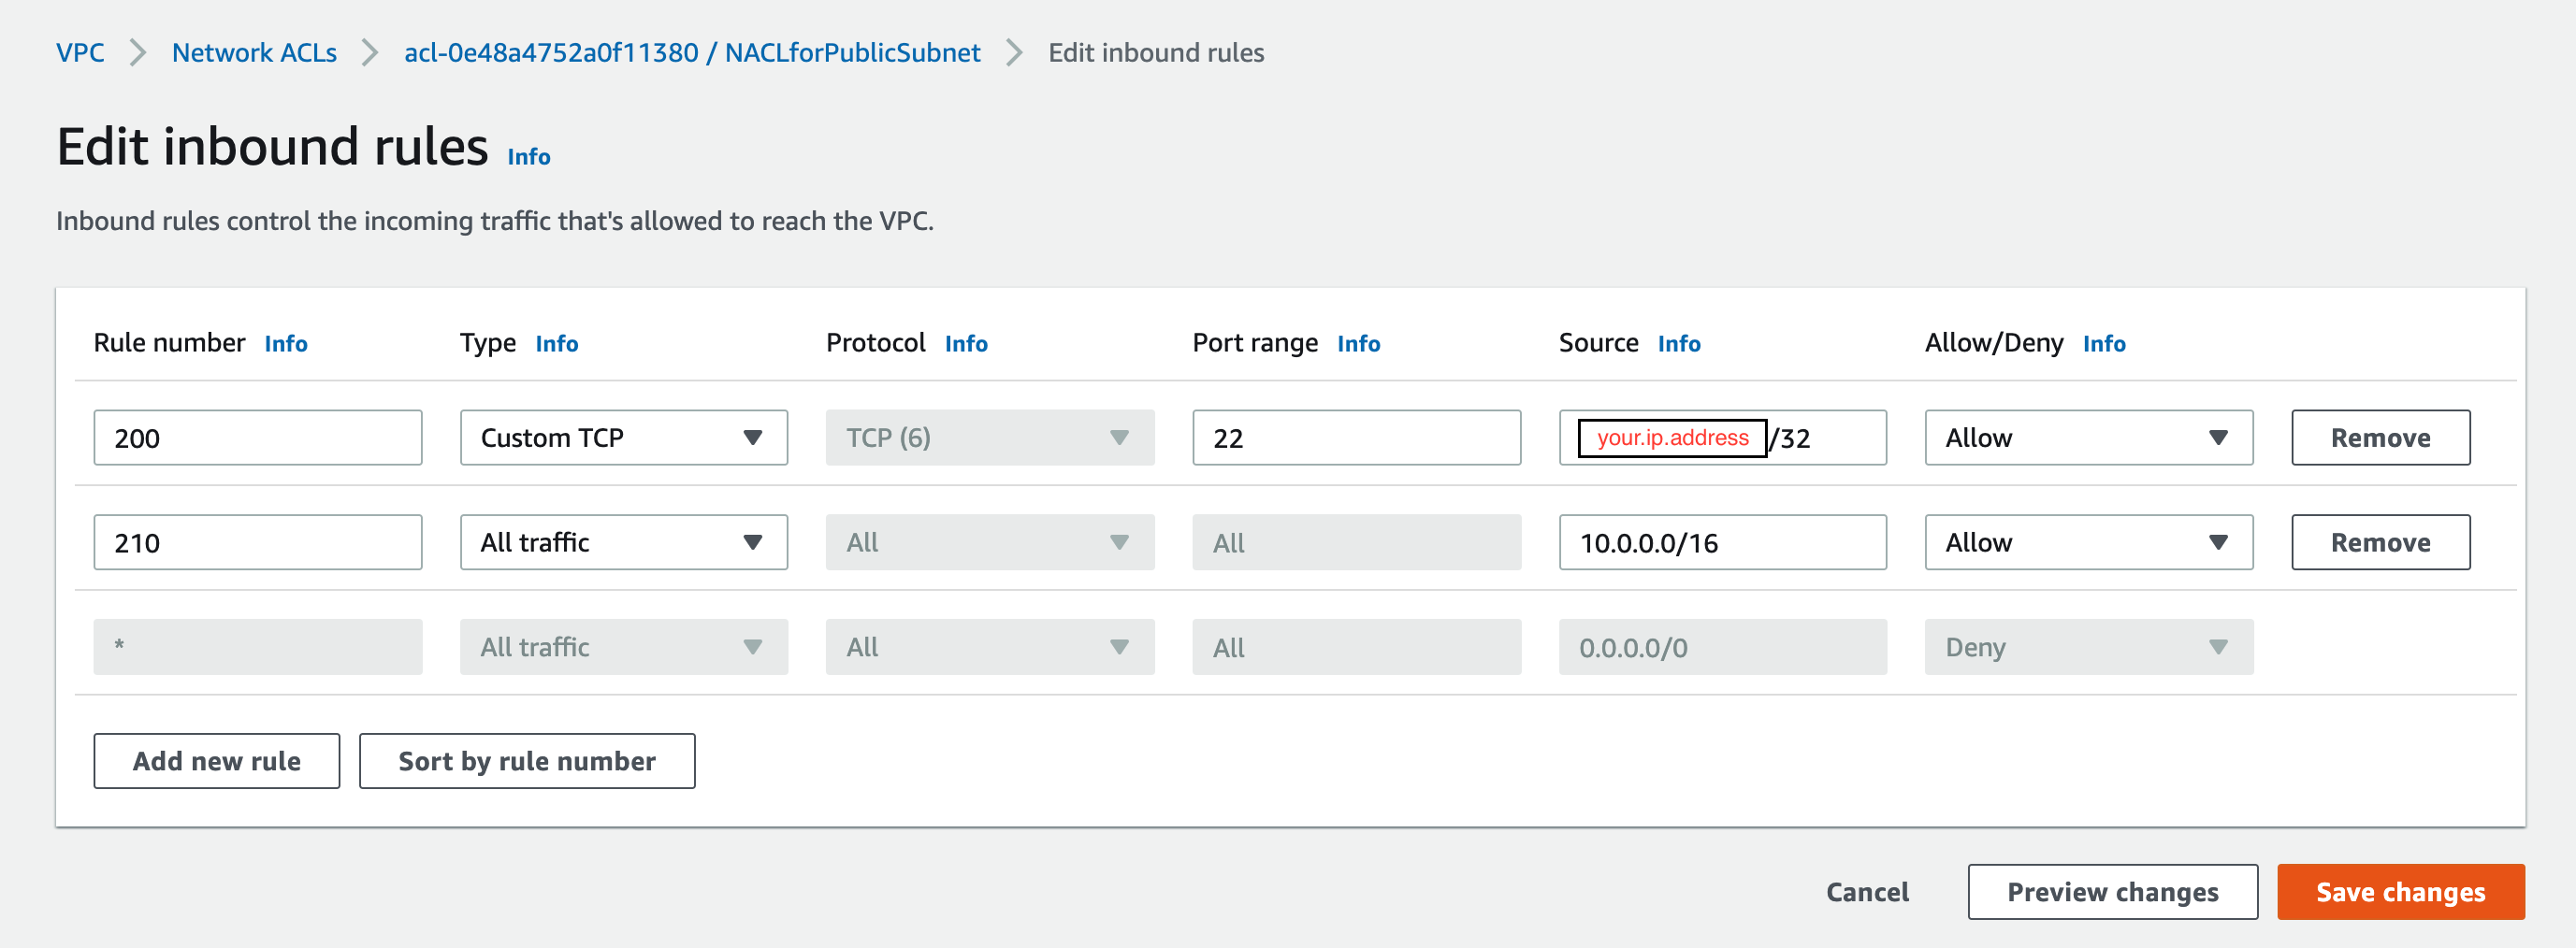
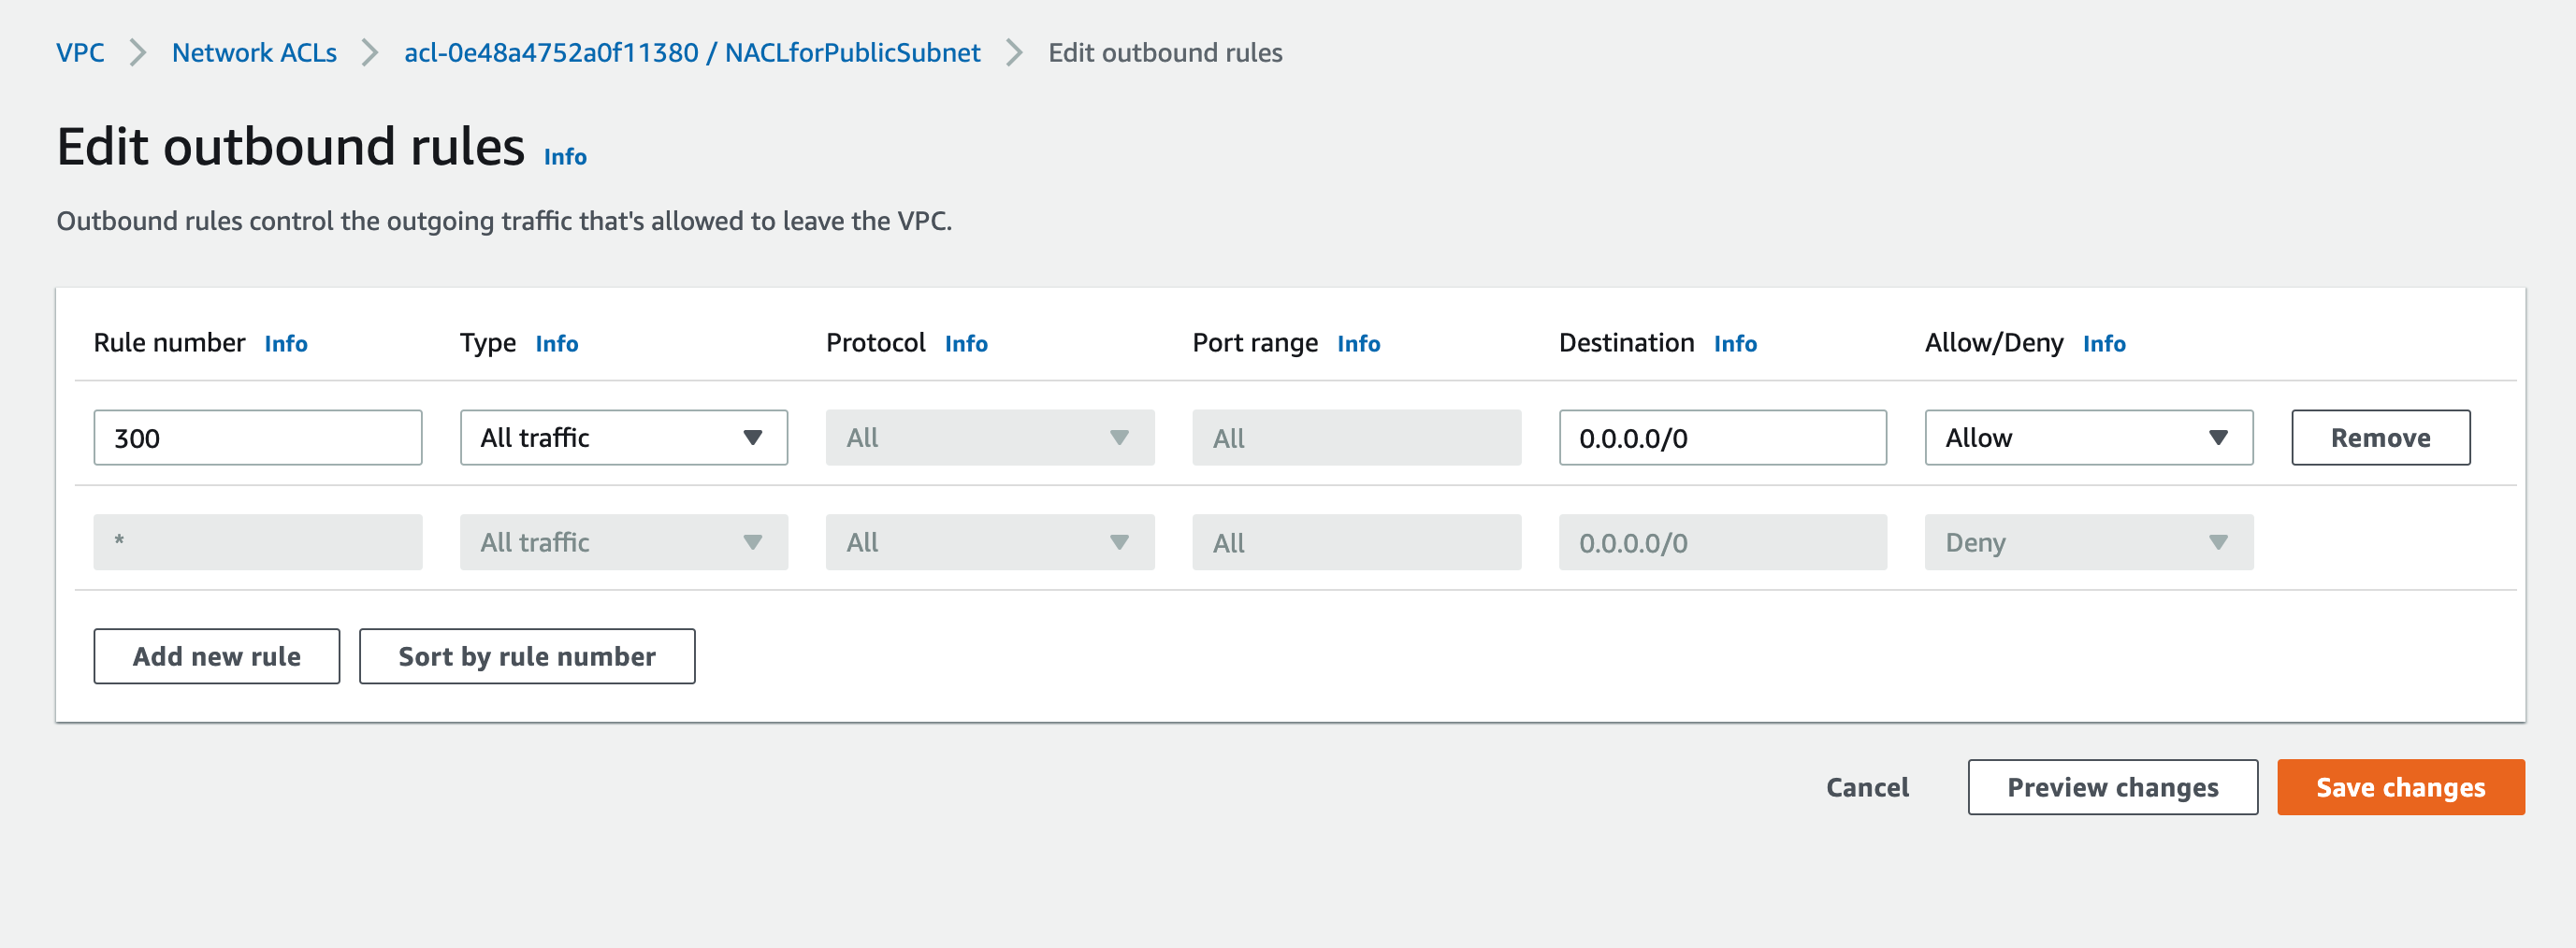
Repeat the steps 3, 4 for Outbound rules, except we allow all outbound traffic:
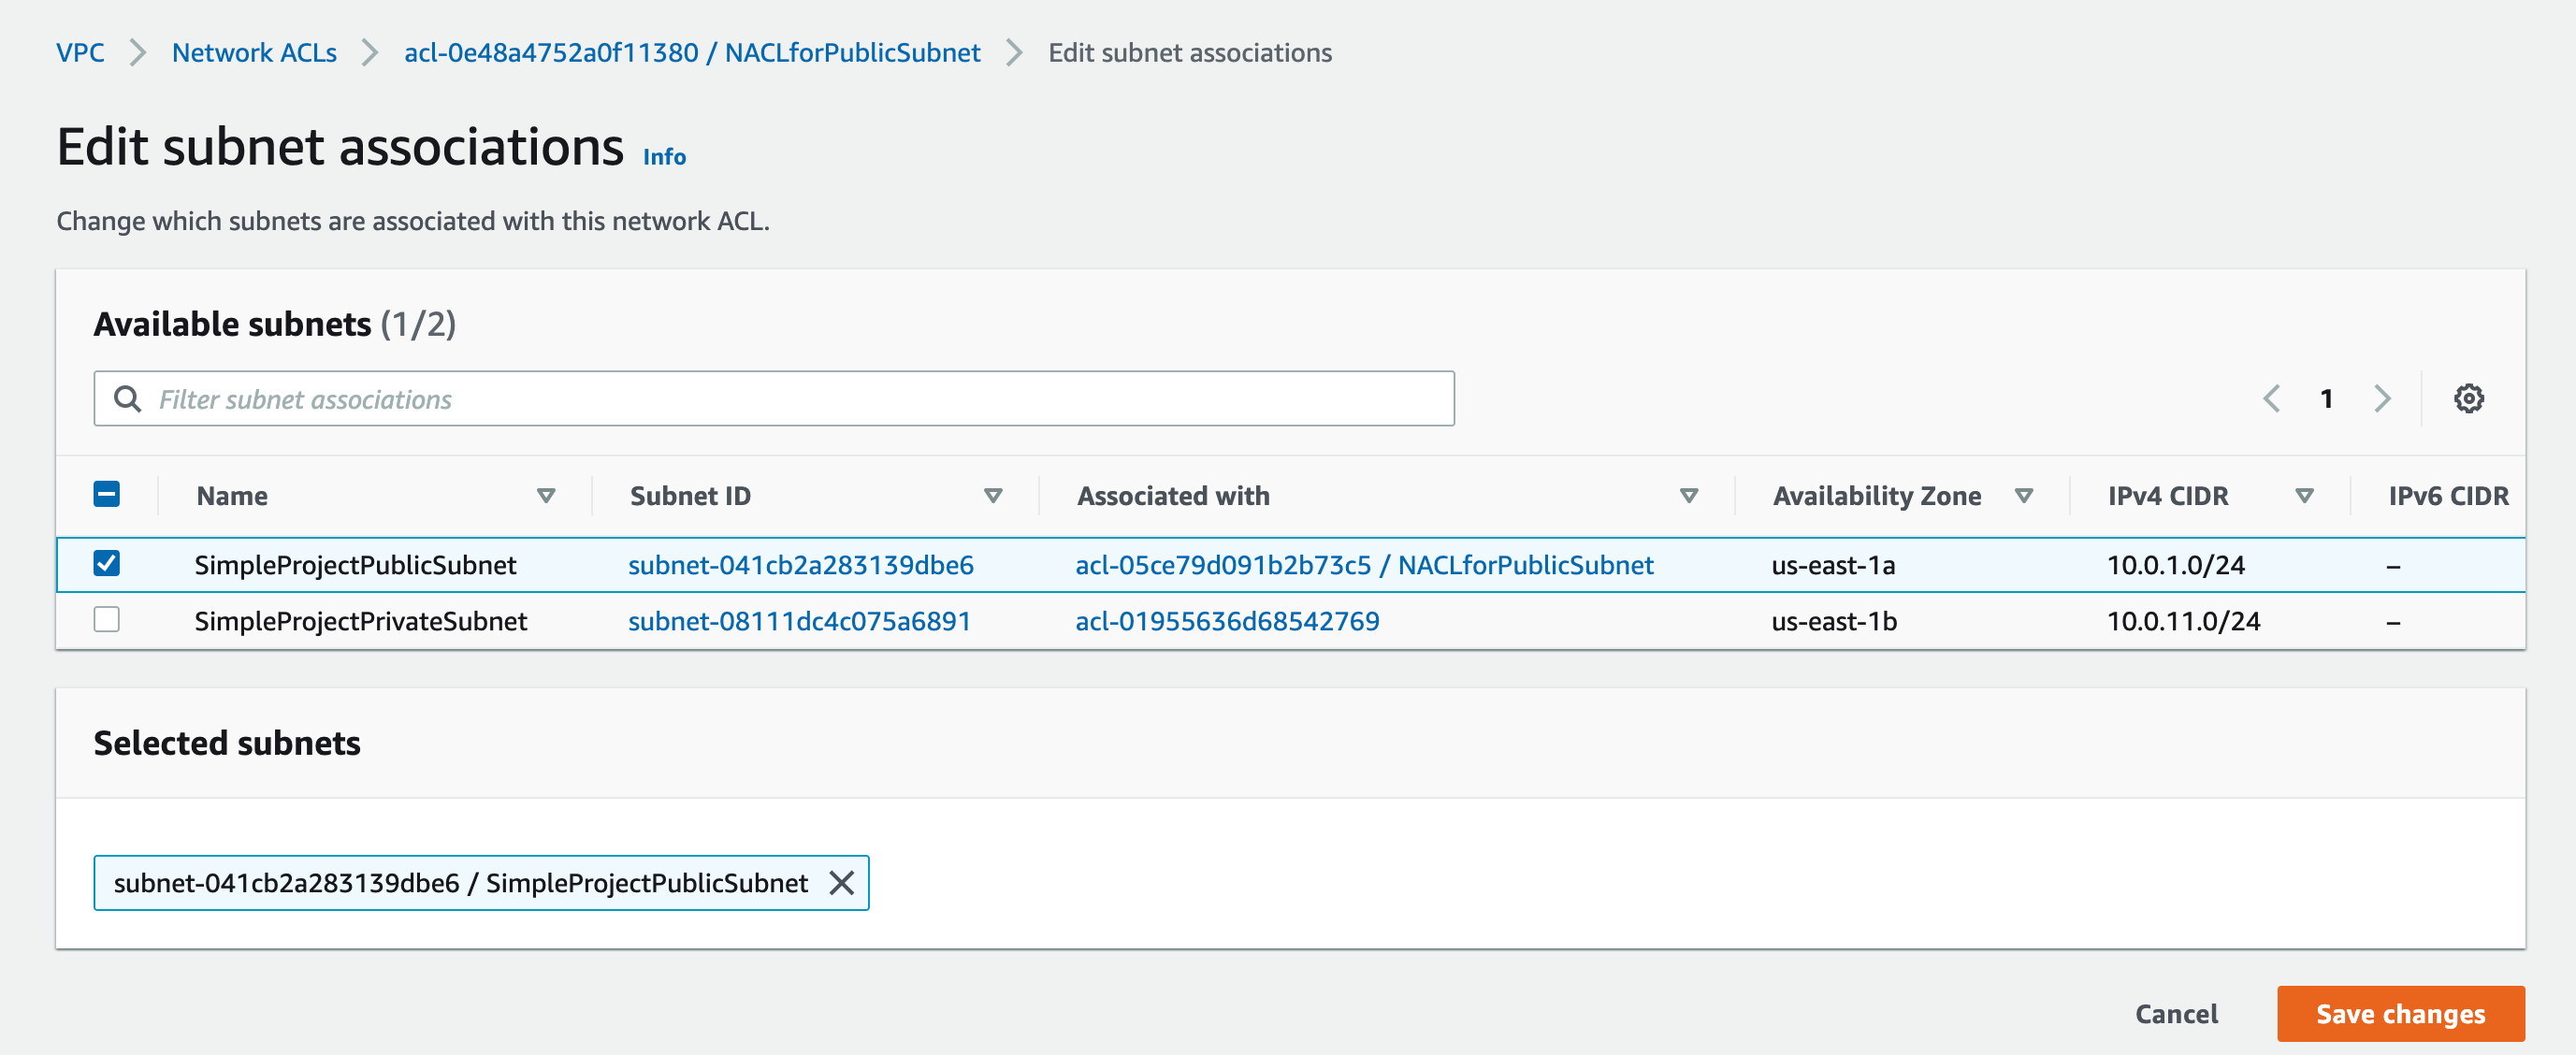
Click the checkbox next to the NACLforPublicSubnet, in the top right, click on Actions and Edit subnet associations:
- click the checkbox next to SimpleProjectPublicSubnet and click on the Save changes
SSH into the Public Instance
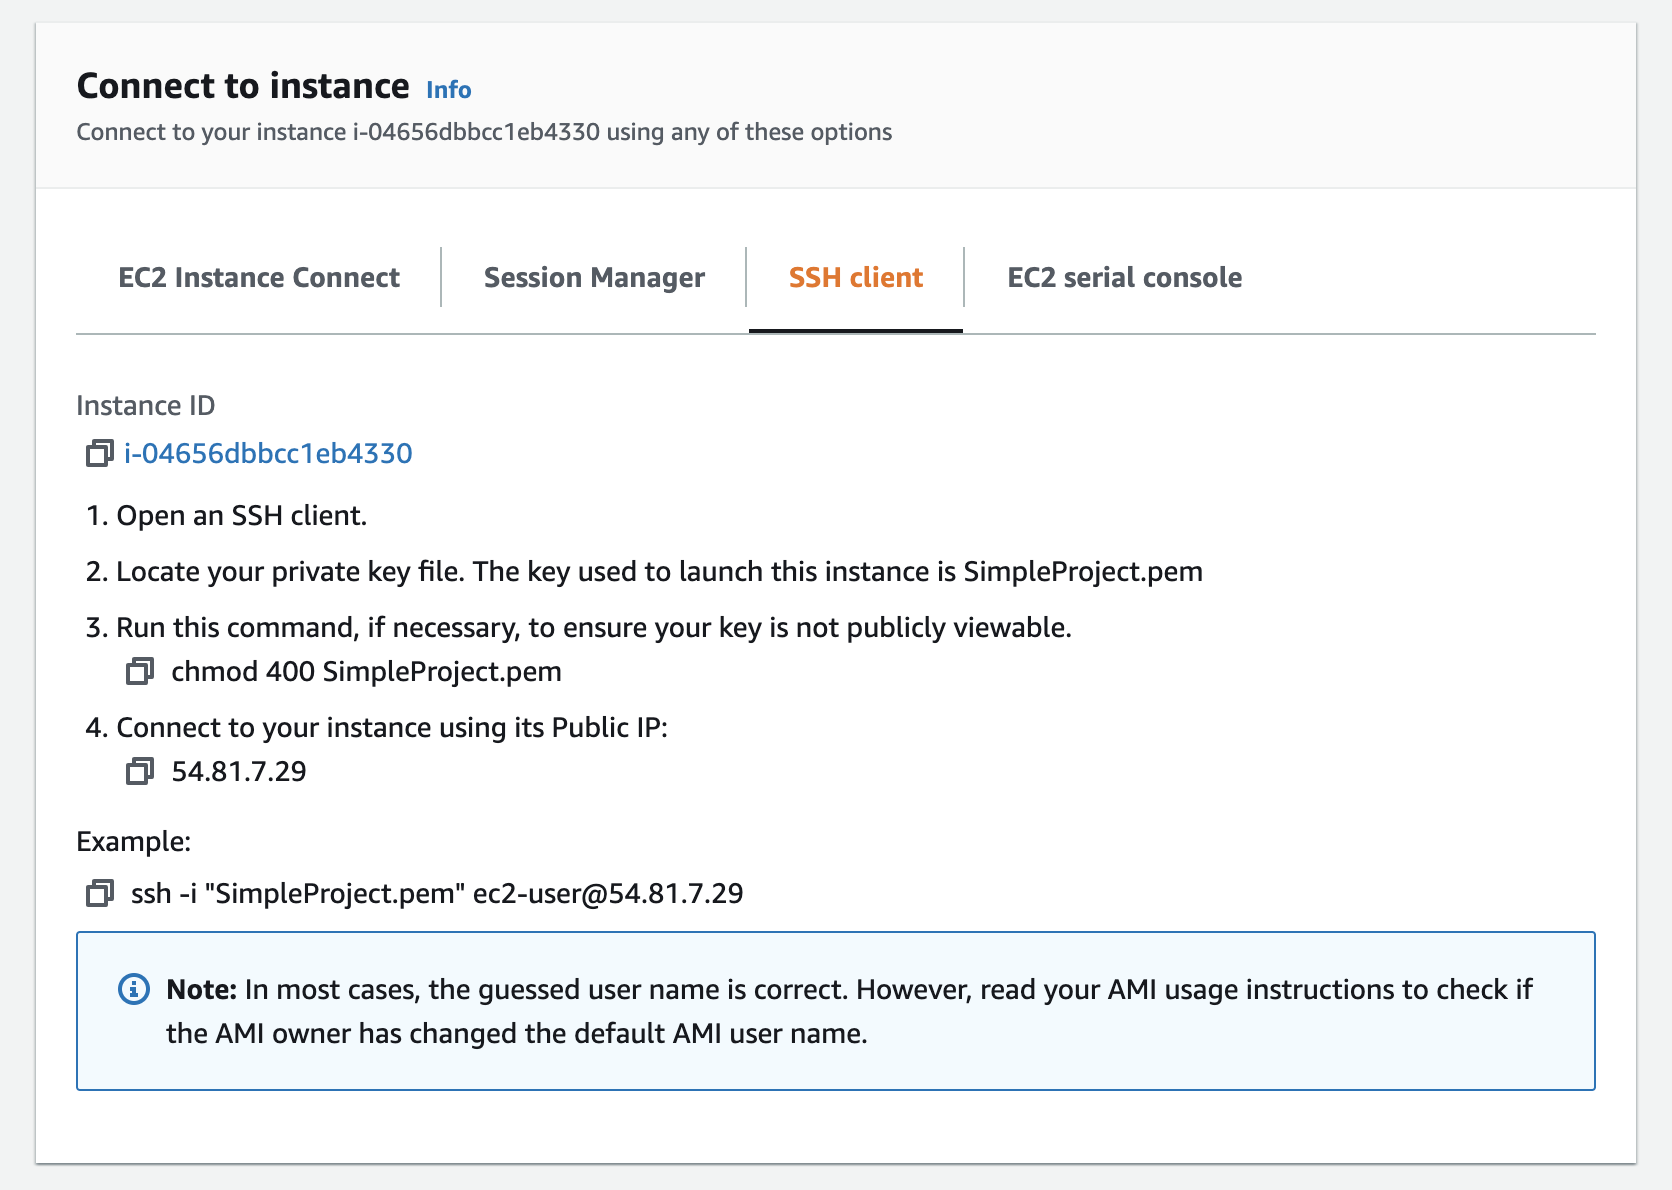
- From the list of instances in the EC2 console, select the SimpleProjectPublicEC2 and click Connect on the top right corner.
- On the Connect to instance page, select the SSH client tab and follow the instructions:
SSH into the Private Instance
- Within the public instance, create a private key, as that will be used for the SSH connection. Run
vi SimpleProjectPrivateEC2.pem(or.ppk) to open Vim and create a new blank.pemfile. - Enter insert mode of Vim by pressing
i. - Open your downloaded file,
SimpleProjectPrivateEC2.pem.pem(or.ppk), in a text editor of your choice and copy the key to your clipboard. - Back in your terminal, paste the contents (use
Command + Von Mac andCtrl + Shift + Von Linux to paste). - Press Escape to exit insert mode and type
:wqto save the file and quit. - Run
chmod 400 SimpleProjectPrivateEC2.pem(or.ppk) - Return to the AWS console, and navigate back to your list of instances by clicking Instances in the navigation line at the top left of the page.
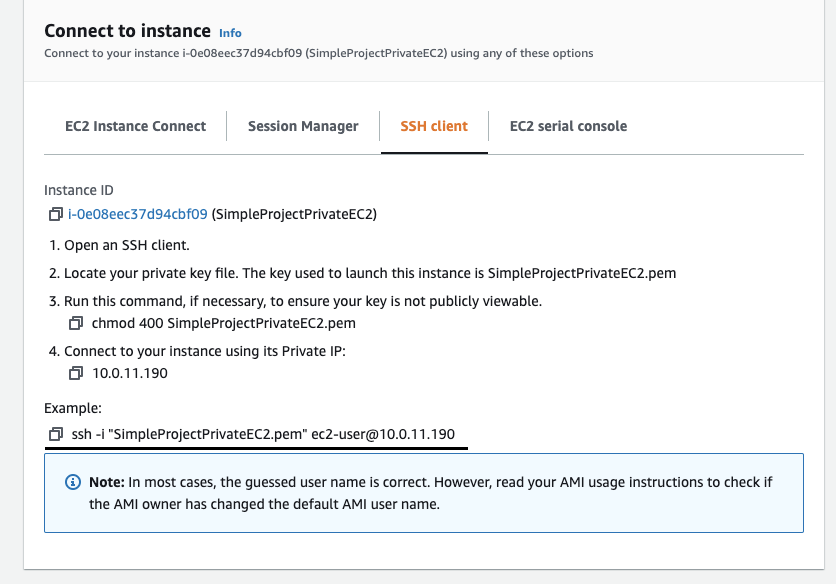
- On the Instances page, click the checkbox next to SimpleProjectPrivateEC2 click Connect on the top right corner.
- On the Instances page, copy the Example command with private IP address and enter in the terminal:
Automating the above with CloudFormation
That was a lot of clicking around! Now, let’s leverage the power of CloudFormation to setup the same infrastructure, but this time with code. Below is the CloudFormation template I prepared (also in GitHub ). Save the template to your local machine, we will need it later.
AWSTemplateFormatVersion: 2010-09-09
Description:  This template deploys a VPC, public and private subnets in us-east1 or us-west-2. It deploys an internet gateway, with a default
  route on the public subnets. It deploys one Linux t2.micro instance in public subnet with Security Group and NetworkAcl with ssh access.
  In addition it deploys another Linux t2.micro instance in private subnet.

Parameters:
  SSHKeyPublicEC2:
    Description: Name of an existing EC2 KeyPair to enable SSH access to the public instance
    Type: AWS::EC2::KeyPair::KeyName
    ConstraintDescription: must be the name of an existing EC2 KeyPair.
  SSHKeyPrivateEC2:
    Description: Name of an existing EC2 KeyPair to enable SSH access to the private instance
    Type: AWS::EC2::KeyPair::KeyName
    ConstraintDescription: must be the name of an existing EC2 KeyPair.
  SSHLocation:
    Description: The IP address range that can be used to SSH to the EC2 instances
    Type: String
    MinLength: '9'
    MaxLength: '18'
    Default: 0.0.0.0/0
    AllowedPattern: (\d{1,3})\.(\d{1,3})\.(\d{1,3})\.(\d{1,3})/(\d{1,2})
    ConstraintDescription: must be a valid IP CIDR range of the form x.x.x.x/x.

Mappings:
  RegionMap:
    us-east-1:
     "AMI": "ami-09d3b3274b6c5d4aa"
    us-west-2:
     "AMI": "ami-0518bb0e75d3619ca"

Resources:
  VPC:
    Type: AWS::EC2::VPC
    Properties:
      CidrBlock: 10.0.0.0/16
      EnableDnsSupport: true
      EnableDnsHostnames: true
      Tags:
        - Key: Name
          Value: SimpleProjectVPC

  InternetGateway:
    Type: AWS::EC2::InternetGateway
    Properties:
      Tags:
        - Key: Name
          Value: SimpleProjectIGW

  InternetGatewayAttachment:
    Type: AWS::EC2::VPCGatewayAttachment
    Properties:
      InternetGatewayId: !Ref InternetGateway
      VpcId: !Ref VPC

  PublicSubnet:
    Type: AWS::EC2::Subnet
    Properties:
      VpcId: !Ref VPC
      AvailabilityZone: us-east-1a
      CidrBlock: 10.0.1.0/24
      MapPublicIpOnLaunch: true
      Tags:
        - Key: Name
          Value: SimpleProjectPublicSubnet

  PrivateSubnet:
    Type: AWS::EC2::Subnet
    Properties:
      VpcId: !Ref VPC
      AvailabilityZone: us-east-1b
      CidrBlock: 10.0.11.0/24
      MapPublicIpOnLaunch: false
      Tags:
        - Key: Name
          Value: SimpleProjectPrivateSubnet

  PublicRouteTable:
    Type: AWS::EC2::RouteTable
    Properties:
      VpcId: !Ref VPC
      Tags:
        - Key: Name
          Value: SimpleProjectPublicRT

  DefaultPublicRoute:
    Type: AWS::EC2::Route
    DependsOn: InternetGatewayAttachment
    Properties:
      RouteTableId: !Ref PublicRouteTable
      DestinationCidrBlock: 0.0.0.0/0
      GatewayId: !Ref InternetGateway

  PublicSubnetRouteTableAssociation:
    Type: AWS::EC2::SubnetRouteTableAssociation
    Properties:
      RouteTableId: !Ref PublicRouteTable
      SubnetId: !Ref PublicSubnet

  PublicSecurityGroup:
    Type: 'AWS::EC2::SecurityGroup'
    Properties:
      GroupDescription: Enable ssh access from your IP address
      SecurityGroupIngress:
        - IpProtocol: tcp
          FromPort: '22'
          ToPort: '22'
          CidrIp: !Ref SSHLocation
        - IpProtocol: tcp
          FromPort: '22'
          ToPort: '22'
          CidrIp: 10.0.0.0/16
      Tags:
       - Key: Name
         Value: SimpleProjectPublicSG
      VpcId: !Ref VPC

  PrivateSecurityGroup:
    Type: 'AWS::EC2::SecurityGroup'
    Properties:
      GroupDescription: Enable ssh access only from VPC
      SecurityGroupIngress:
        - IpProtocol: tcp
          FromPort: '22'
          ToPort: '22'
          CidrIp: 10.0.0.0/16
      Tags:
       - Key: Name
         Value: SimpleProjectPrivateSG
      VpcId: !Ref VPC

  PublicEC2Instance:
    Type: AWS::EC2::Instance
    Properties:
      ImageId: !FindInMap [RegionMap, !Ref "AWS::Region", AMI]
      InstanceType: t2.micro
      SubnetId: !Ref PublicSubnet
      KeyName: !Ref SSHKeyPublicEC2
      SecurityGroupIds:
        - !Ref PublicSecurityGroup
      Tags:
       - Key: Name
         Value: SimpleProjectPublicEC2

  PrivateEC2Instance:
    Type: AWS::EC2::Instance
    Properties:
      ImageId: !FindInMap [RegionMap, !Ref "AWS::Region", AMI]
      InstanceType: t2.micro
      SubnetId: !Ref PrivateSubnet
      KeyName: !Ref SSHKeyPrivateEC2
      SecurityGroupIds:
        - !Ref PrivateSecurityGroup
      Tags:
       - Key: Name
         Value: SimpleProjectPrivateEC2

  PublicNACL:
    Type: AWS::EC2::NetworkAcl
    Properties:
       VpcId: !Ref VPC
       Tags:
       - Key: Name
         Value: NACLforPublicSubnet

  PublicNACLAssociation:
    Type: AWS::EC2::SubnetNetworkAclAssociation
    Properties:
      SubnetId: !Ref PublicSubnet
      NetworkAclId: !Ref PublicNACL

  PublicInboundRule1:
    Type: AWS::EC2::NetworkAclEntry
    Properties:
       NetworkAclId: !Ref PublicNACL
       RuleNumber: '200'
       Protocol: '6'
       RuleAction: allow
       CidrBlock: !Ref SSHLocation
       PortRange:
         From: '22'
         To: '22'

  PublicInboundRule2:
    Type: AWS::EC2::NetworkAclEntry
    Properties:
       NetworkAclId: !Ref PublicNACL
       RuleNumber: '210'
       Protocol: '-1'
       RuleAction: allow
       CidrBlock: 10.0.0.0/16
       PortRange:
         From: '22'
         To: '22'

  PublicOutboundRule:
    Type: AWS::EC2::NetworkAclEntry
    Properties:
       NetworkAclId: !Ref PublicNACL
       RuleNumber: '300'
       Protocol: '-1'
       Egress: true
       RuleAction: allow
       CidrBlock: 0.0.0.0/0

Outputs:
  PublicIp:
    Description: Public IP of the first EC2 instance, ssh -i <key> ec2-user@<ip>.compute-1.amazonaws.com
    Value: !GetAtt PublicEC2Instance.PublicIp
  PrivateIp:
    Description: Private IP of the first EC2 instance
    Value: !GetAtt PrivateEC2Instance.PrivateIp
Before we begin, we need to create key pairs in order to ssh into the instances that CloudFormation will create.
Create Key Pair for Public EC2 instance:
- Make sure you are in us-east-1 region
- Go to EC2 dashboard and click on create:
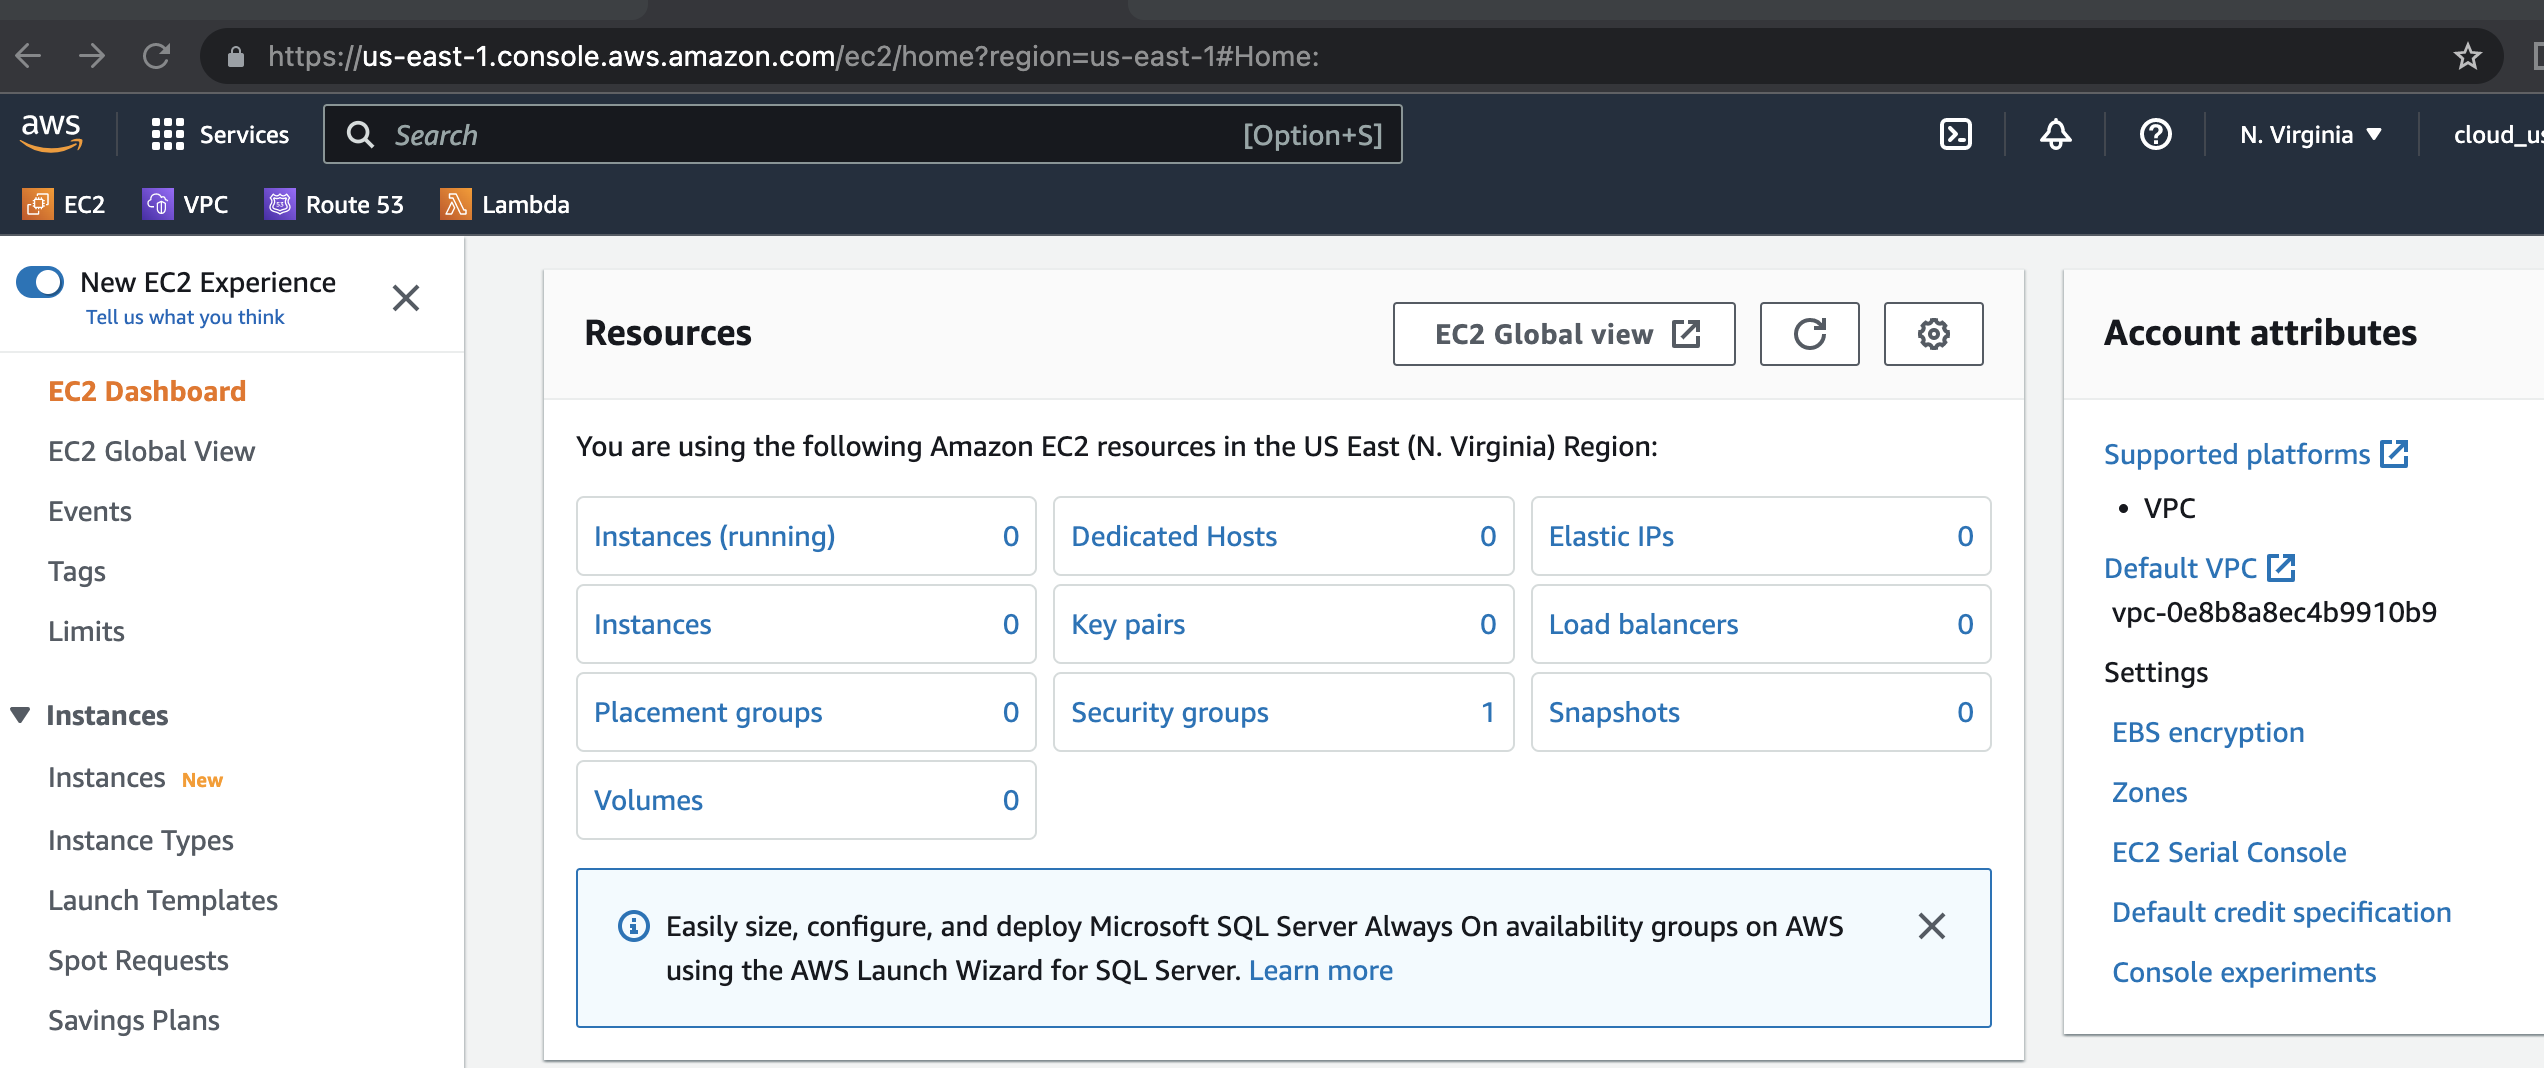
- On the Create key pair page, enter SSHKeyPublicEC2. Select .pem file type if you are mac and .ppk if on windows:
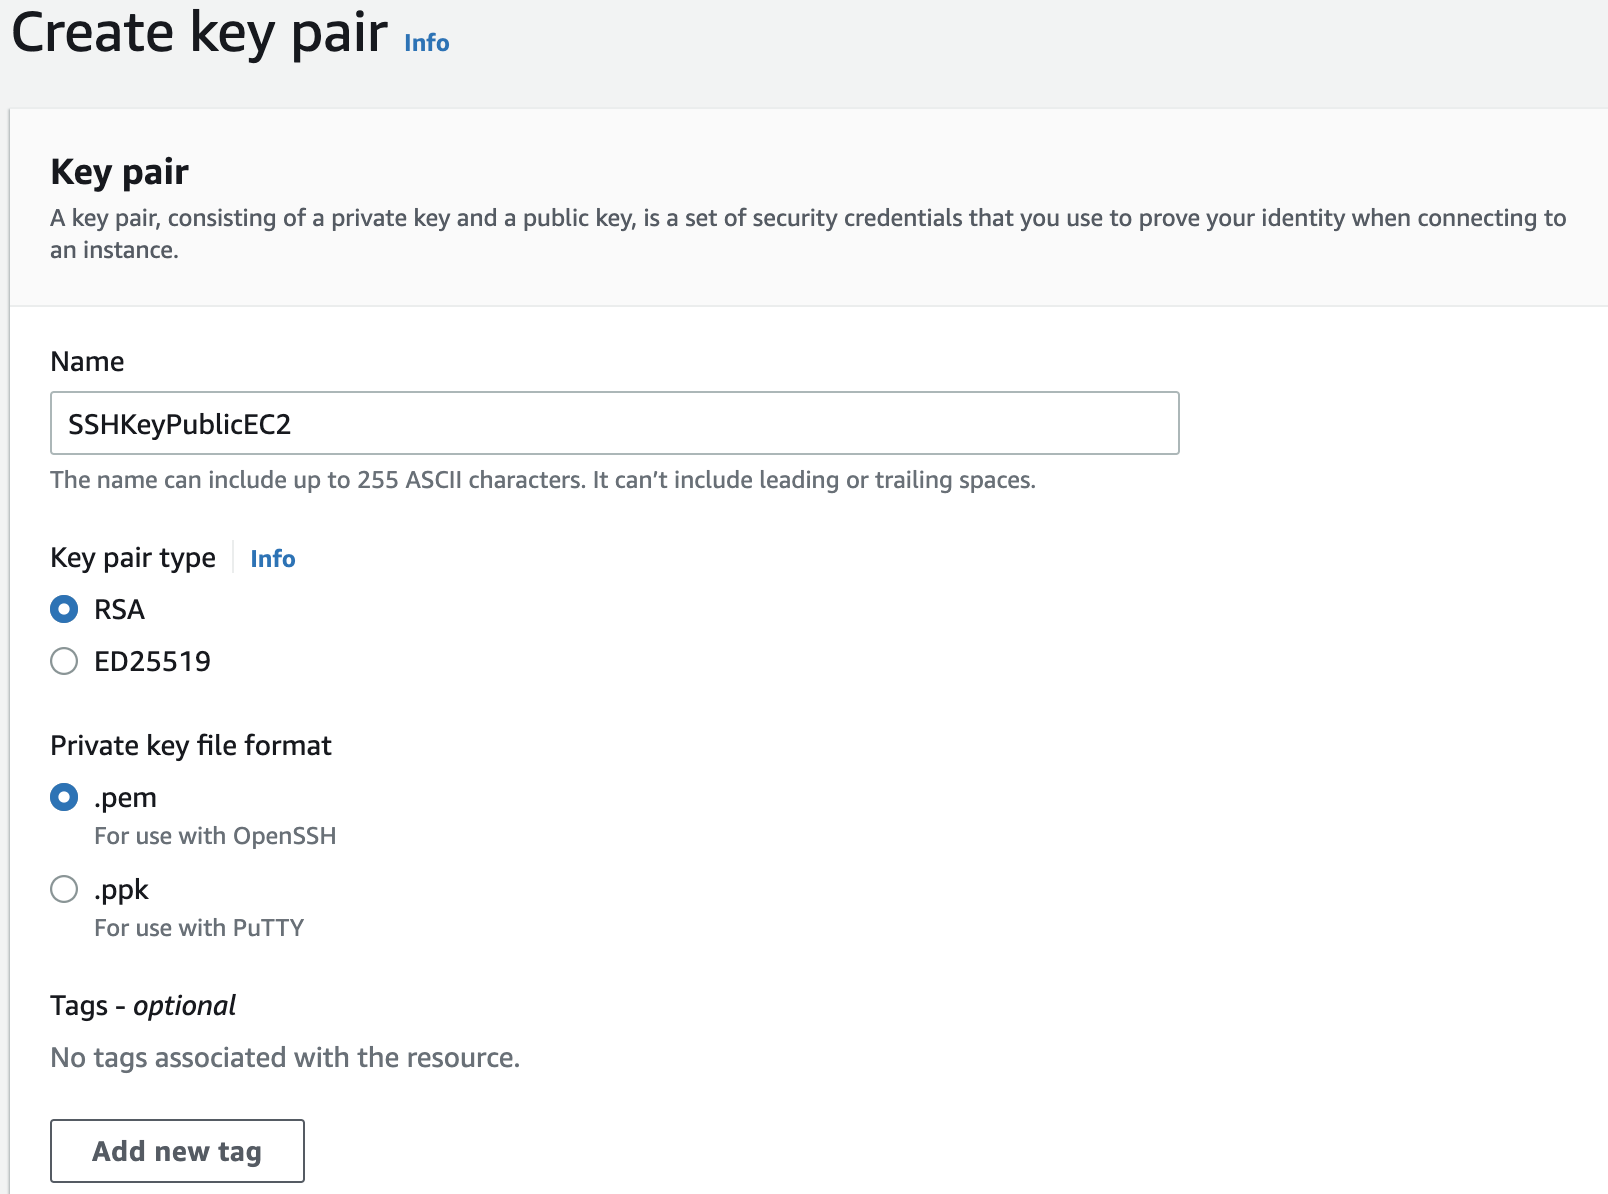
- Click on Create key pair.
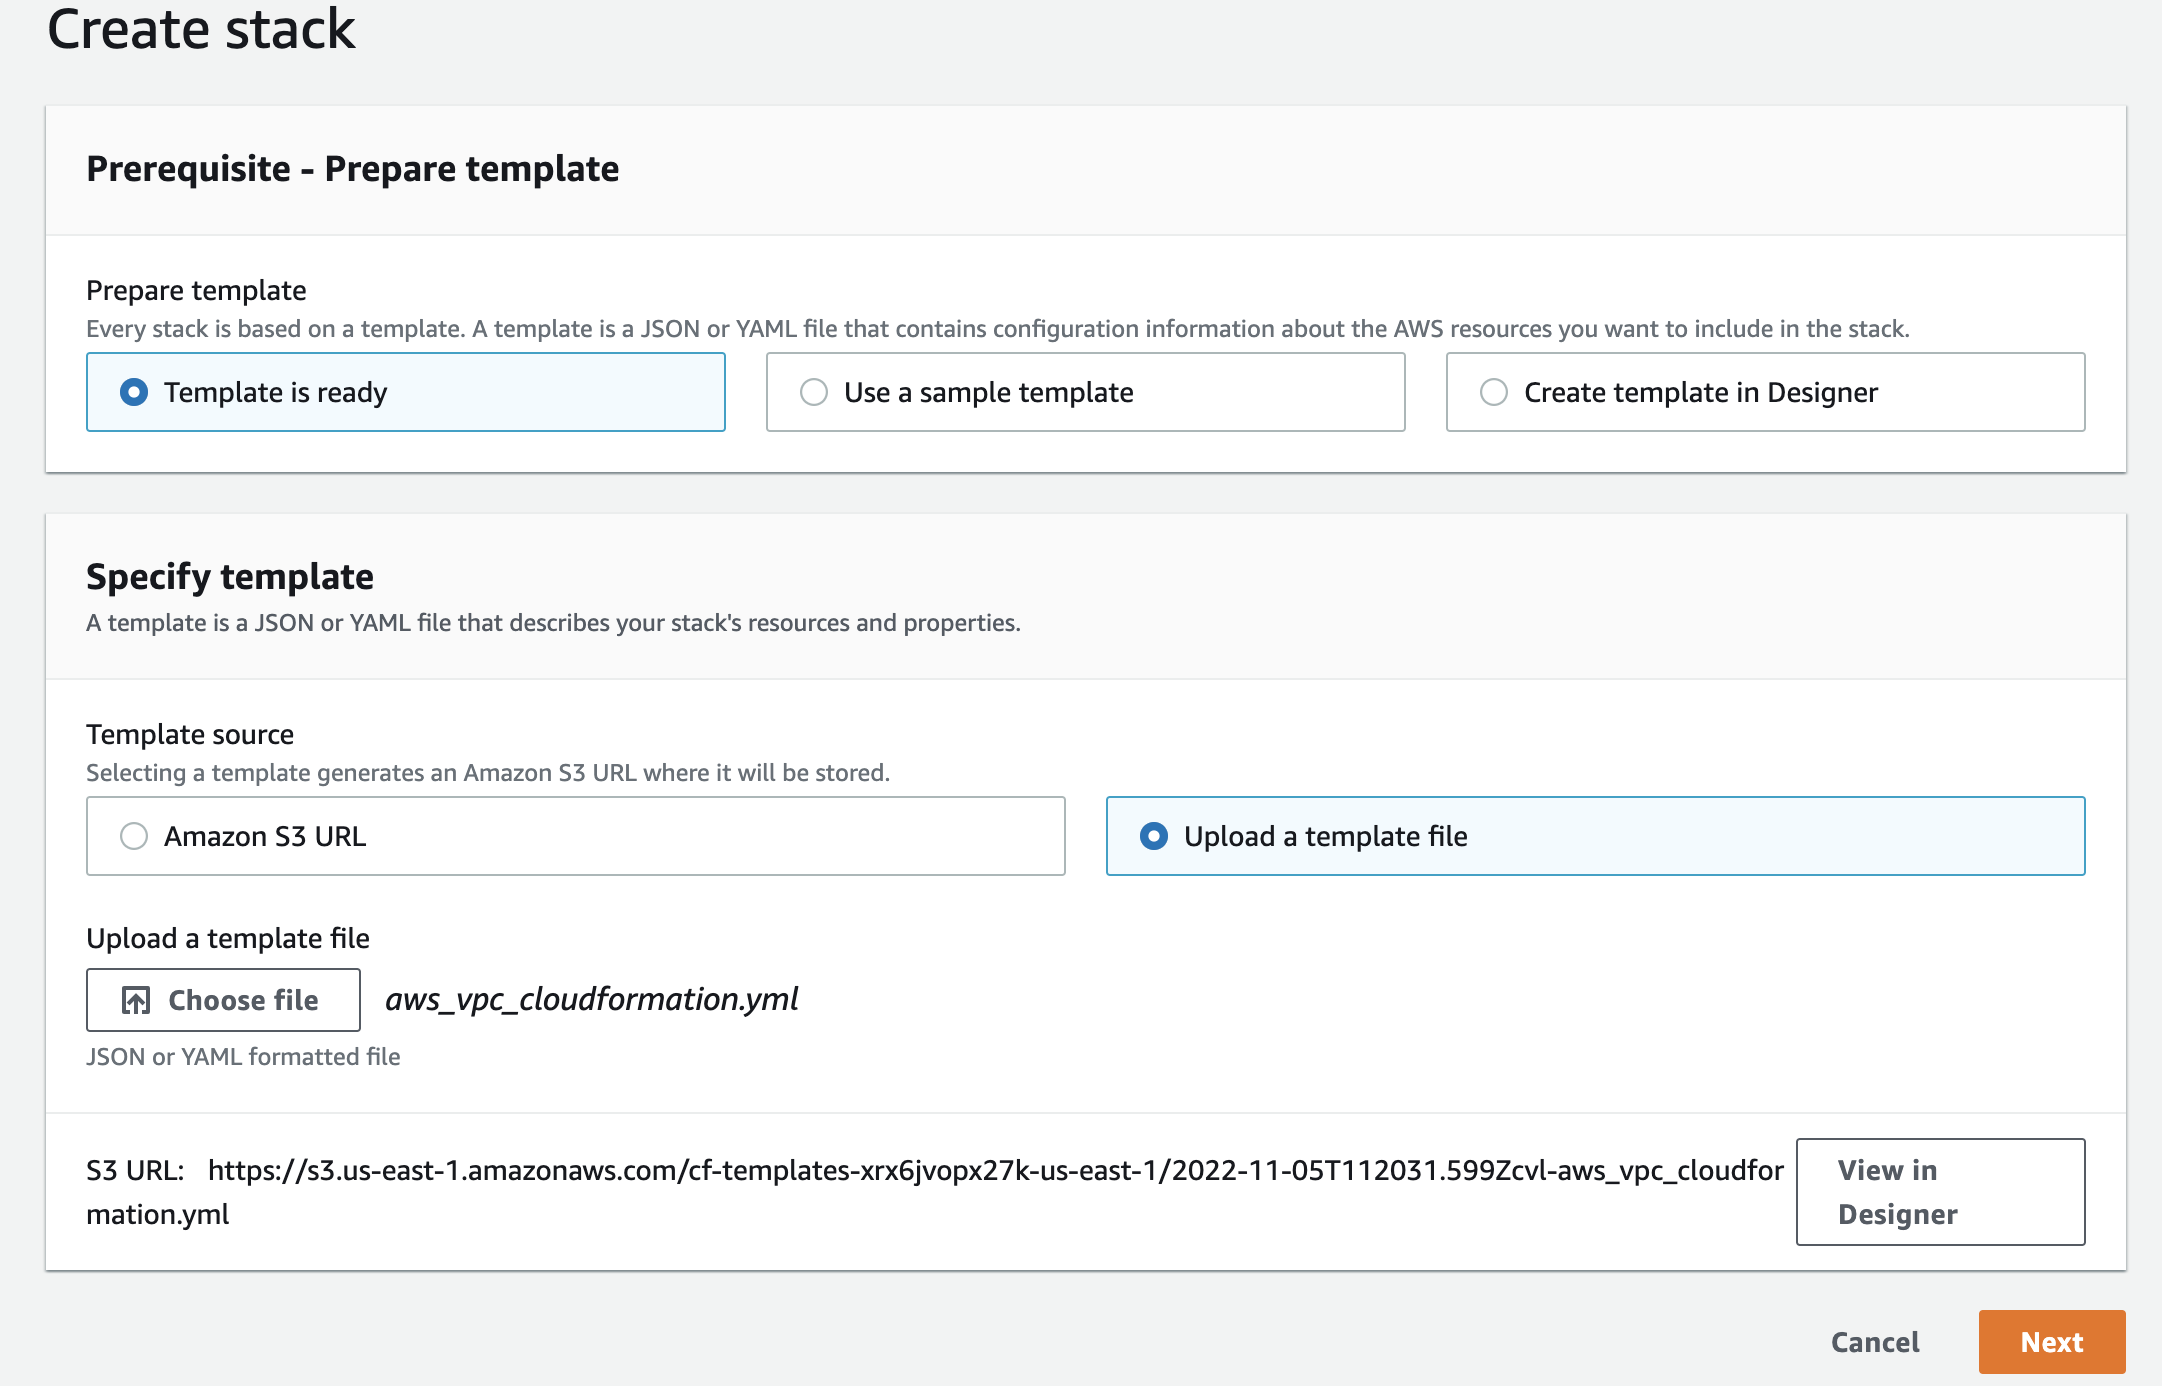
In order to upload our template to CloudFormation, navigate CloudFormation from AWS services page, click Create stack With new resources (standard):

- On create stack page, select Upload a template file and choose the file you saved earlier. Click on Next to proceed:
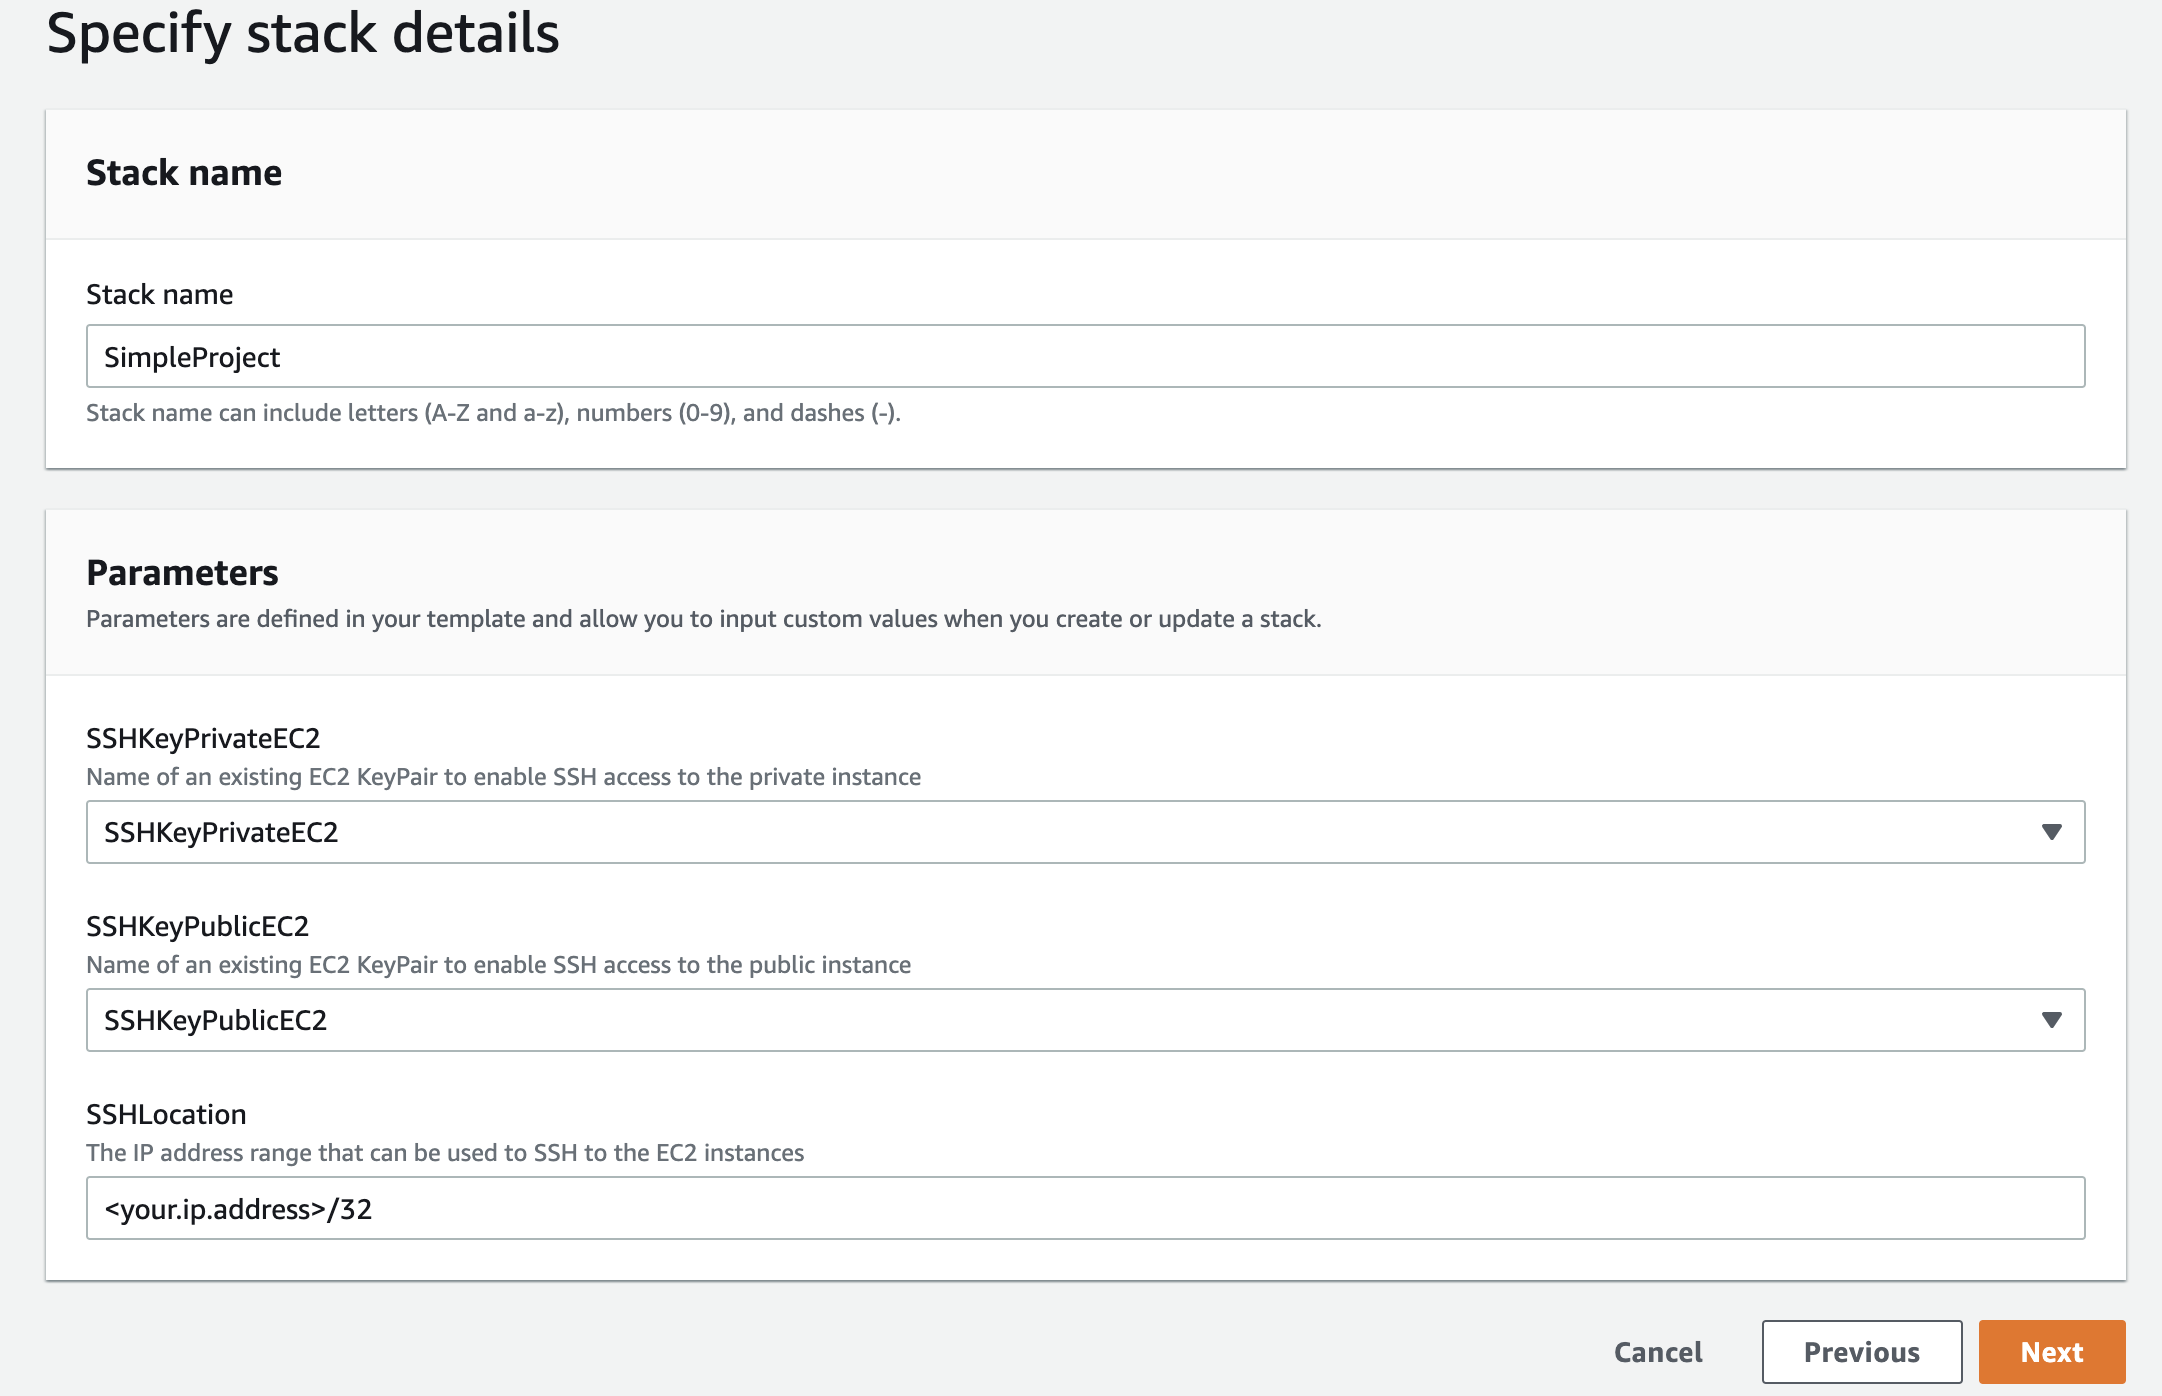
- On the Specify stack details page, enter the details (replace <your.ip.address> with your IP address; google my IPv4 address) and click on Next:
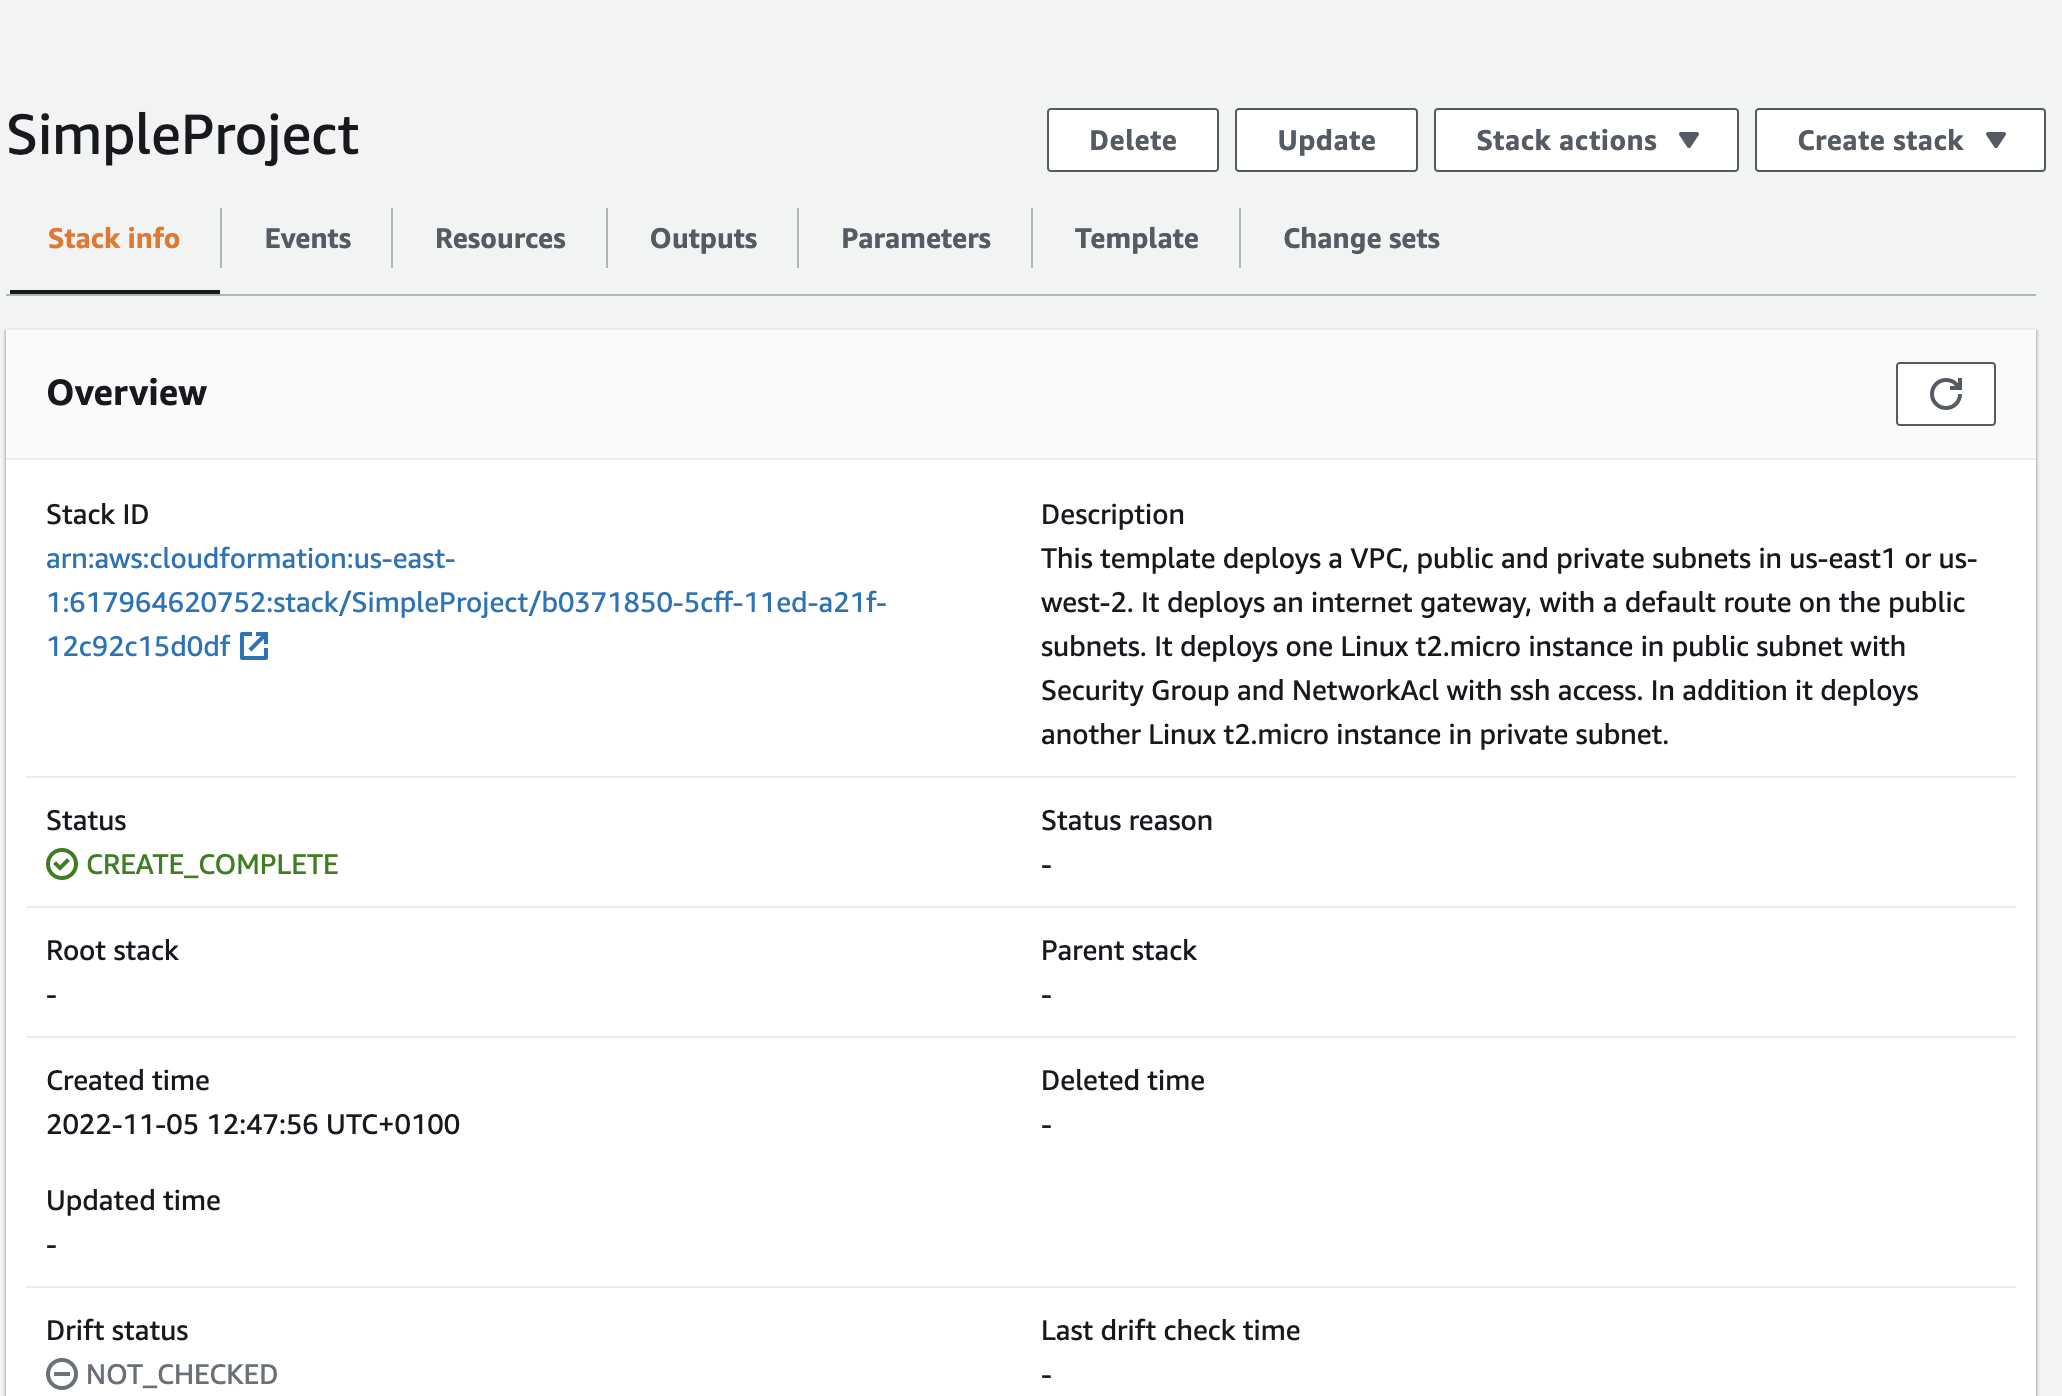
- Congrats! CloudFormation created the same infrastructure for us:
For any questions and consultation, reach out at nurbol.sakenov@outlook.com


